
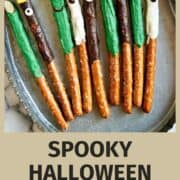
These Halloween Pretzel Rods are the cutest dessert you'll make all season! Easy, fun, and perfect for kids' parties! Ghosts, Witch's Fingers, Frankenstein, and Monsters await!
Halloween is just around the corner, and it's the perfect time to get creative in the kitchen and whip up some fun Halloween treats. If you're looking for a cute and easy recipe to add to your dessert table or share at Halloween parties these Chocolate-Covered Halloween Pretzel Rods are the answer. These salty treats are some of my new favorite Halloween recipes! They are a perfect treat for the season a are a great way to get your kids into the Halloween spirit!
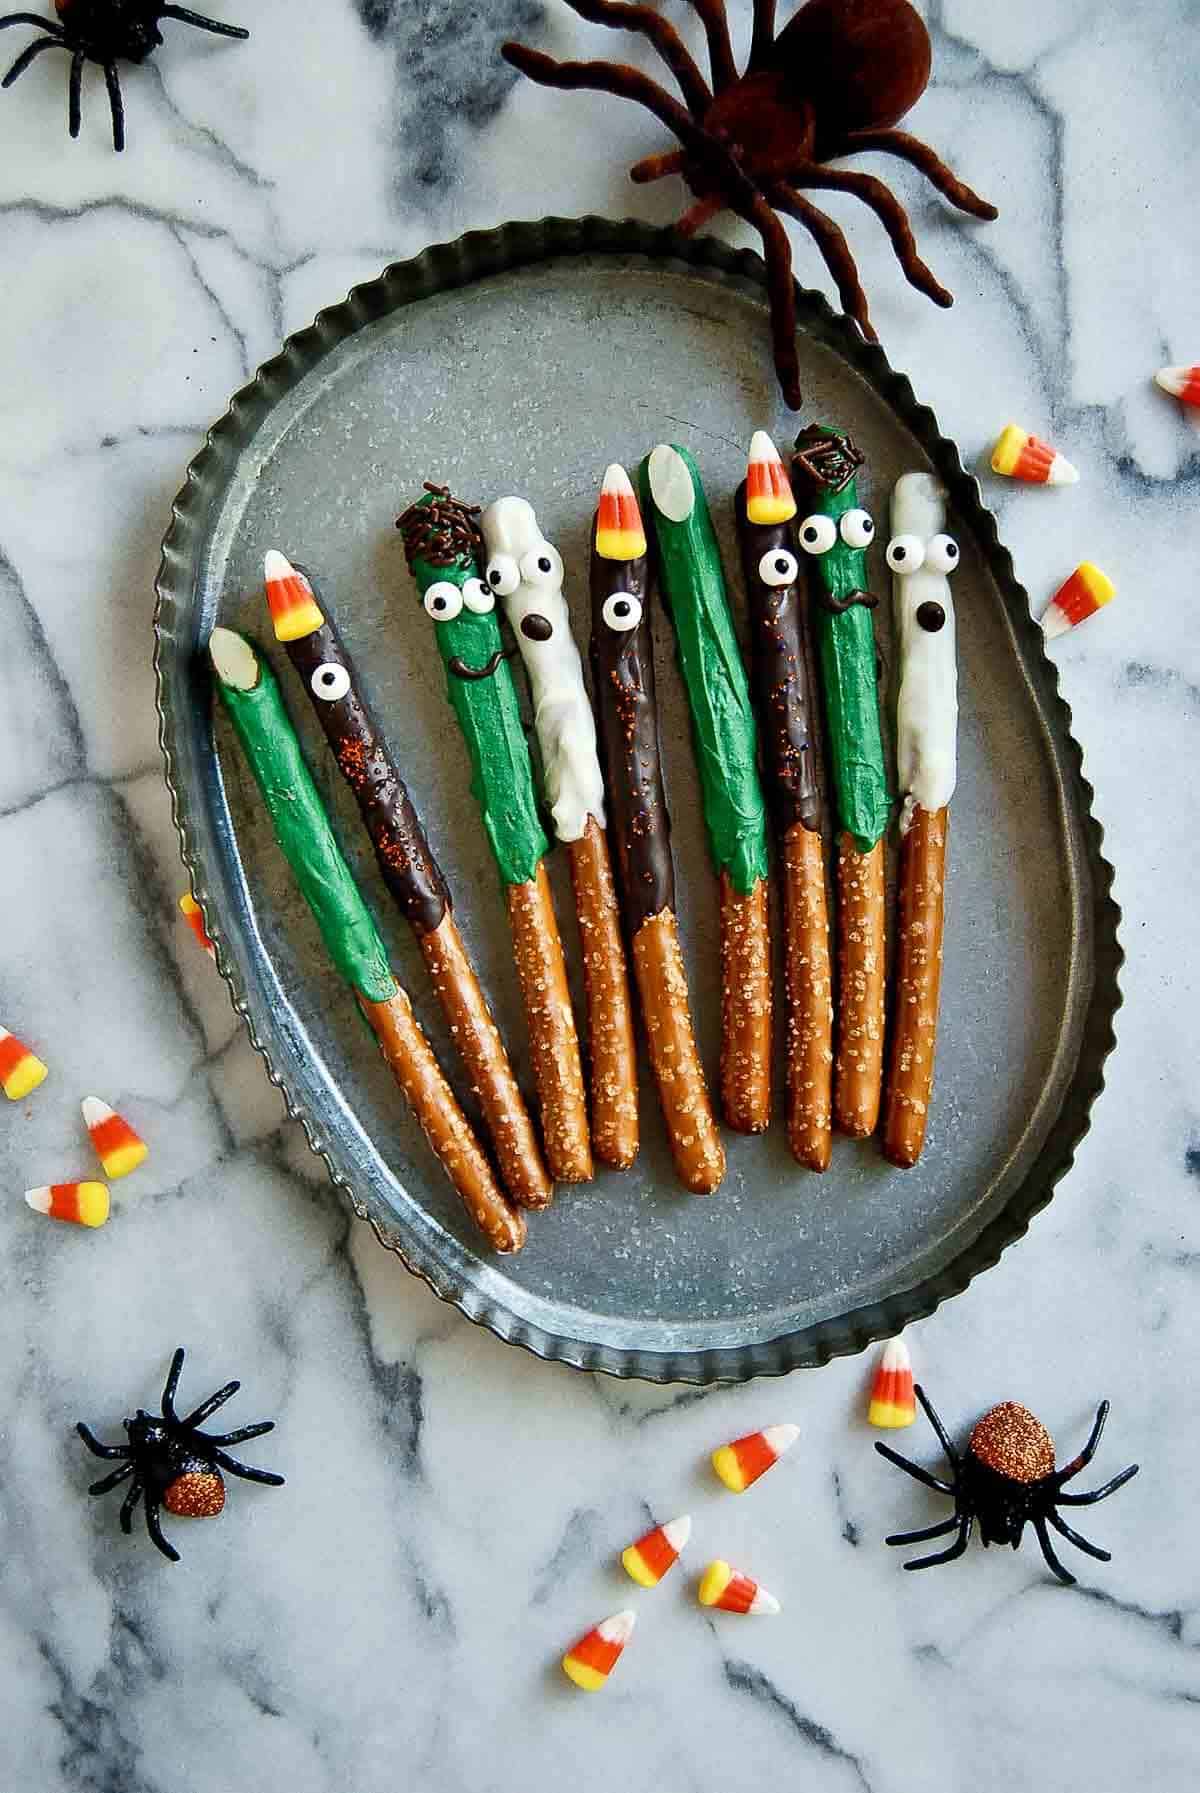
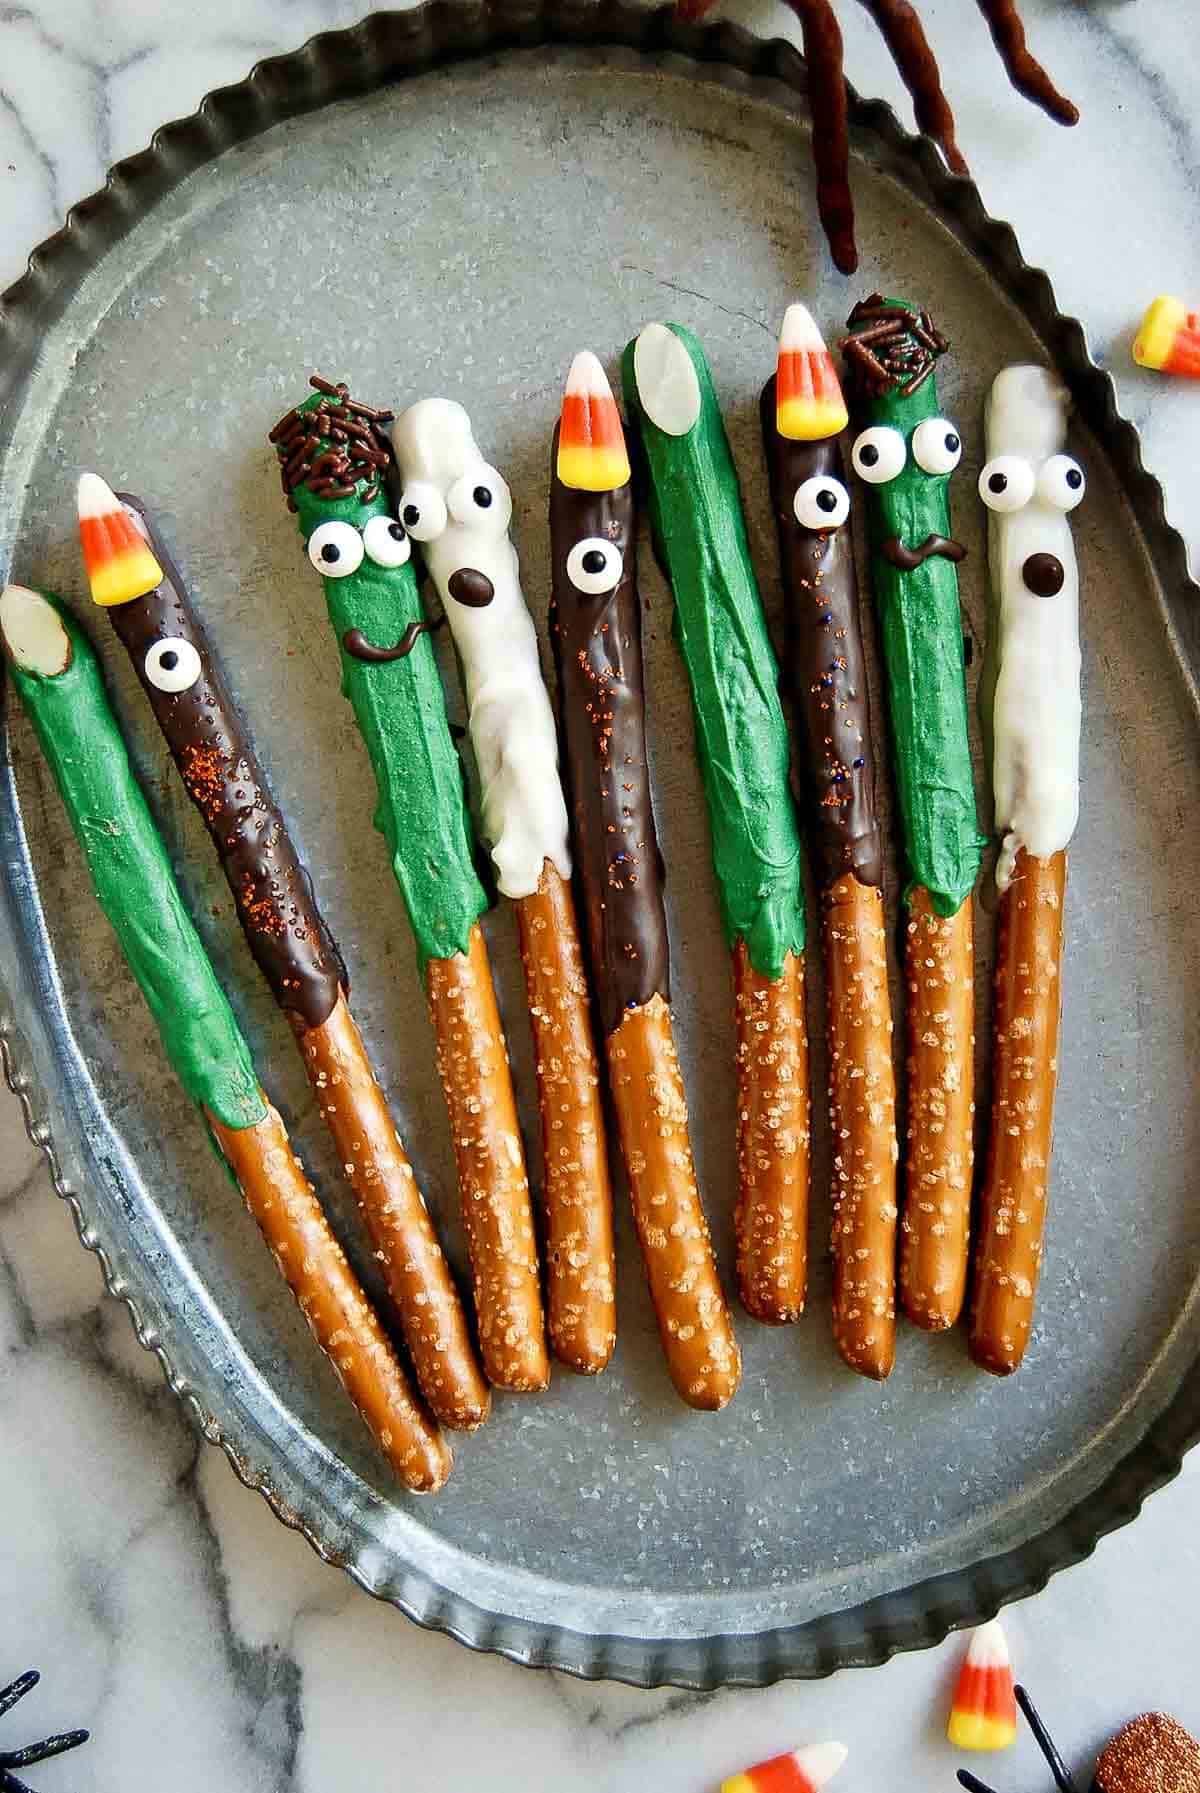
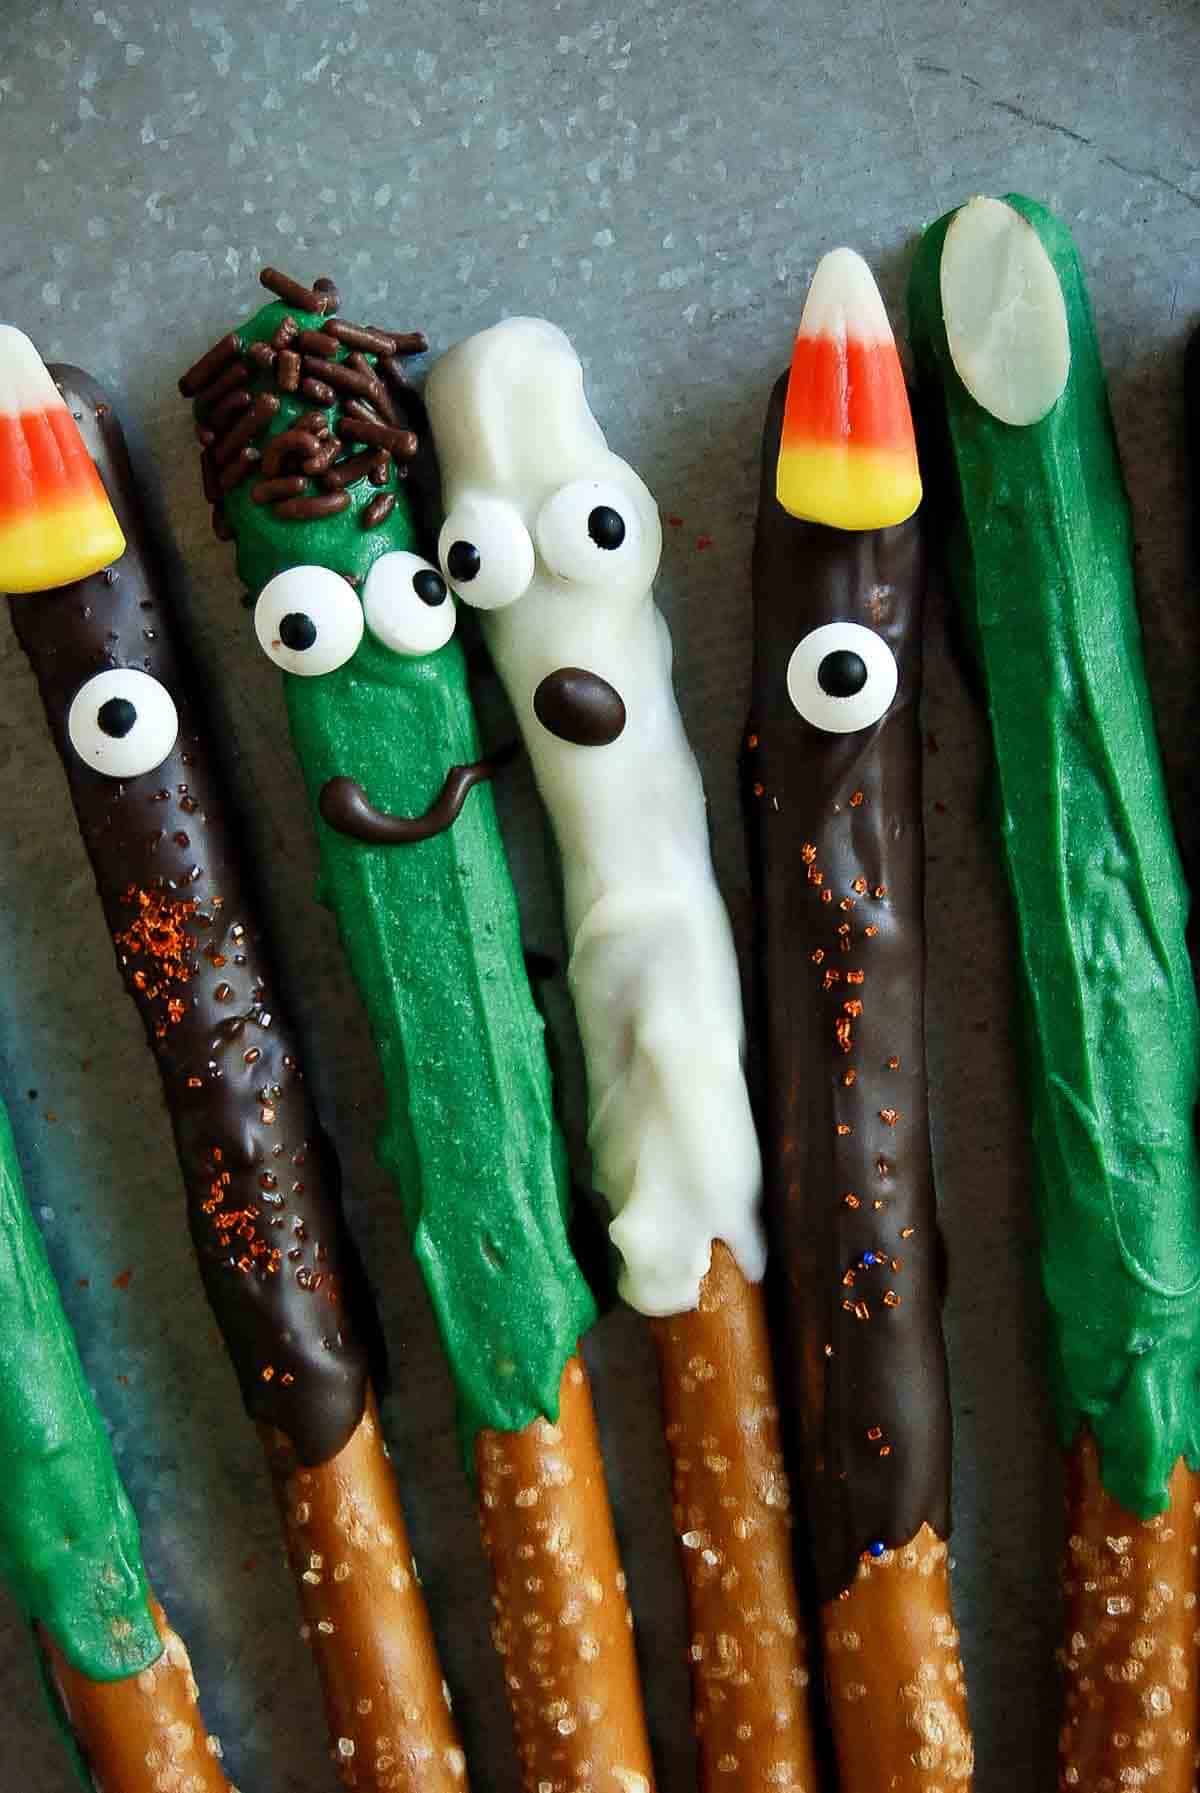
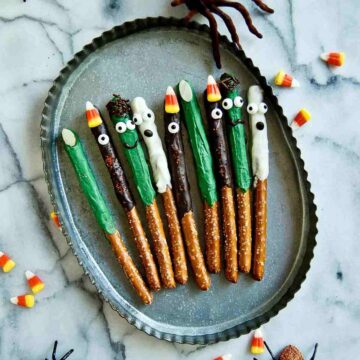
A perfect combination of sweet and salty, these Halloween pretzel rods are a favorite treat for both little kids and adults. The best part is you can get super creative with your designs. I made Witch's Fingers, Ghosts, Frankenstein, and Monsters.
In This Post
Why This Recipe Works
What makes these Halloween pretzels a standout choice for Halloween festivities? So many reasons!
- Easy: This is an incredibly easy recipe to make. There's no baking involved and you can make these Halloween pretzel sticks as indicated or as simple as you wish. You'll be amazed at how quickly you can whip up a batch of these Halloween pretzel rods.
- Family Fun: It's a fantastic way to get the whole family involved in the kitchen. Kids will have a blast decorating these spooky treats, making it a perfect family bonding activity.
- Versatility: You can get as creative as you like with decorations, making this festive treat perfect for any Halloween-themed event, from class parties to a fun dessert at home, or even to hand out to Trick or Treaters!
- Salty and Sweet: The combination of salty pretzels and sweet chocolate is a match made in heaven. It's a taste sensation that everyone loves.
Ingredients
Before you start, make sure you have these ingredients and materials on hand:
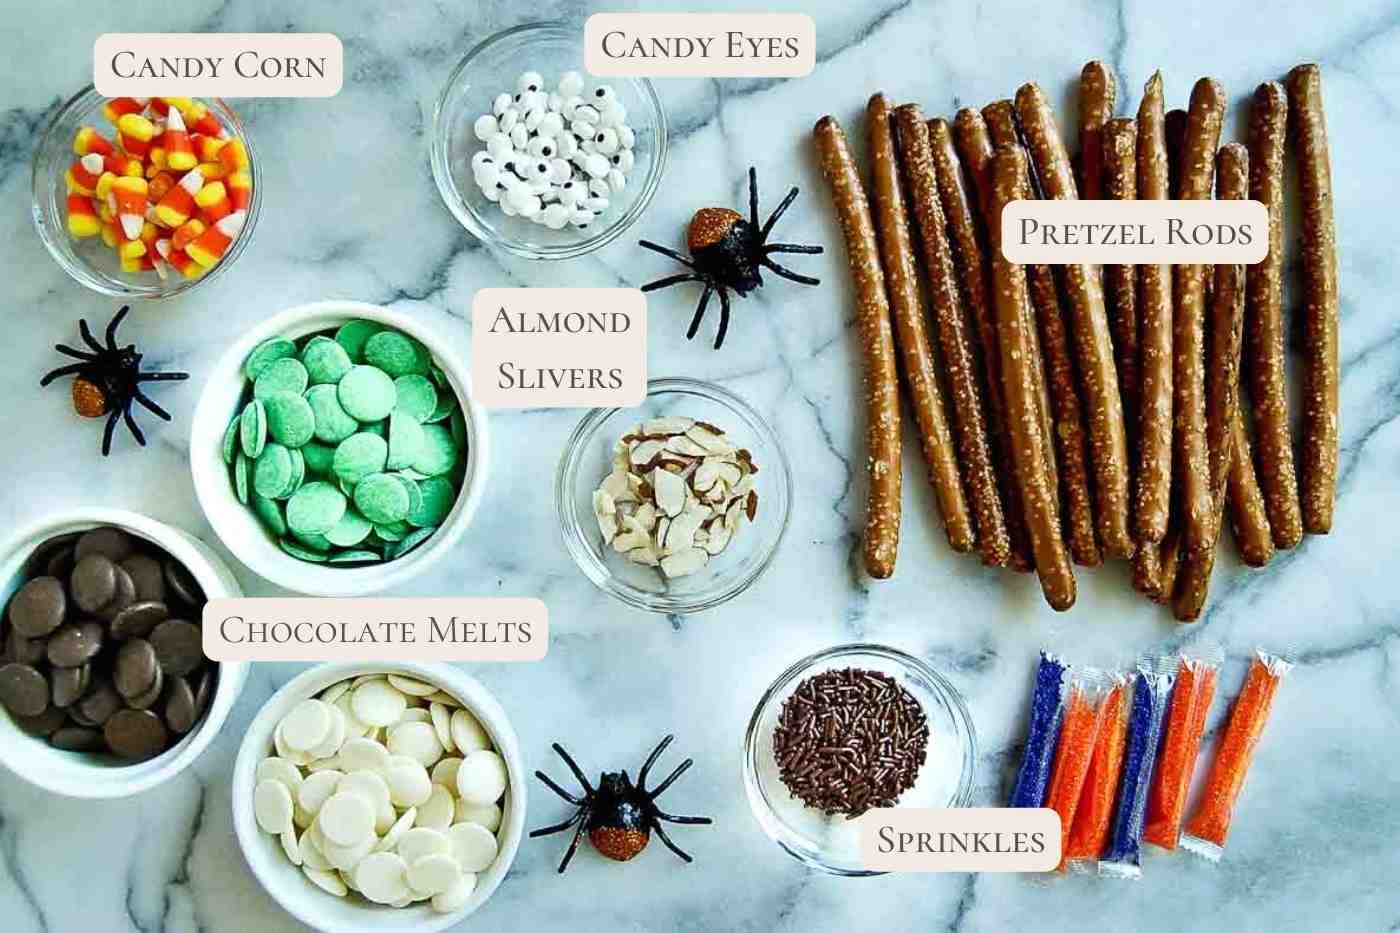
- Pretzel rods. You want the long thick salted pretzel rods here, not the mini pretzel sticks.
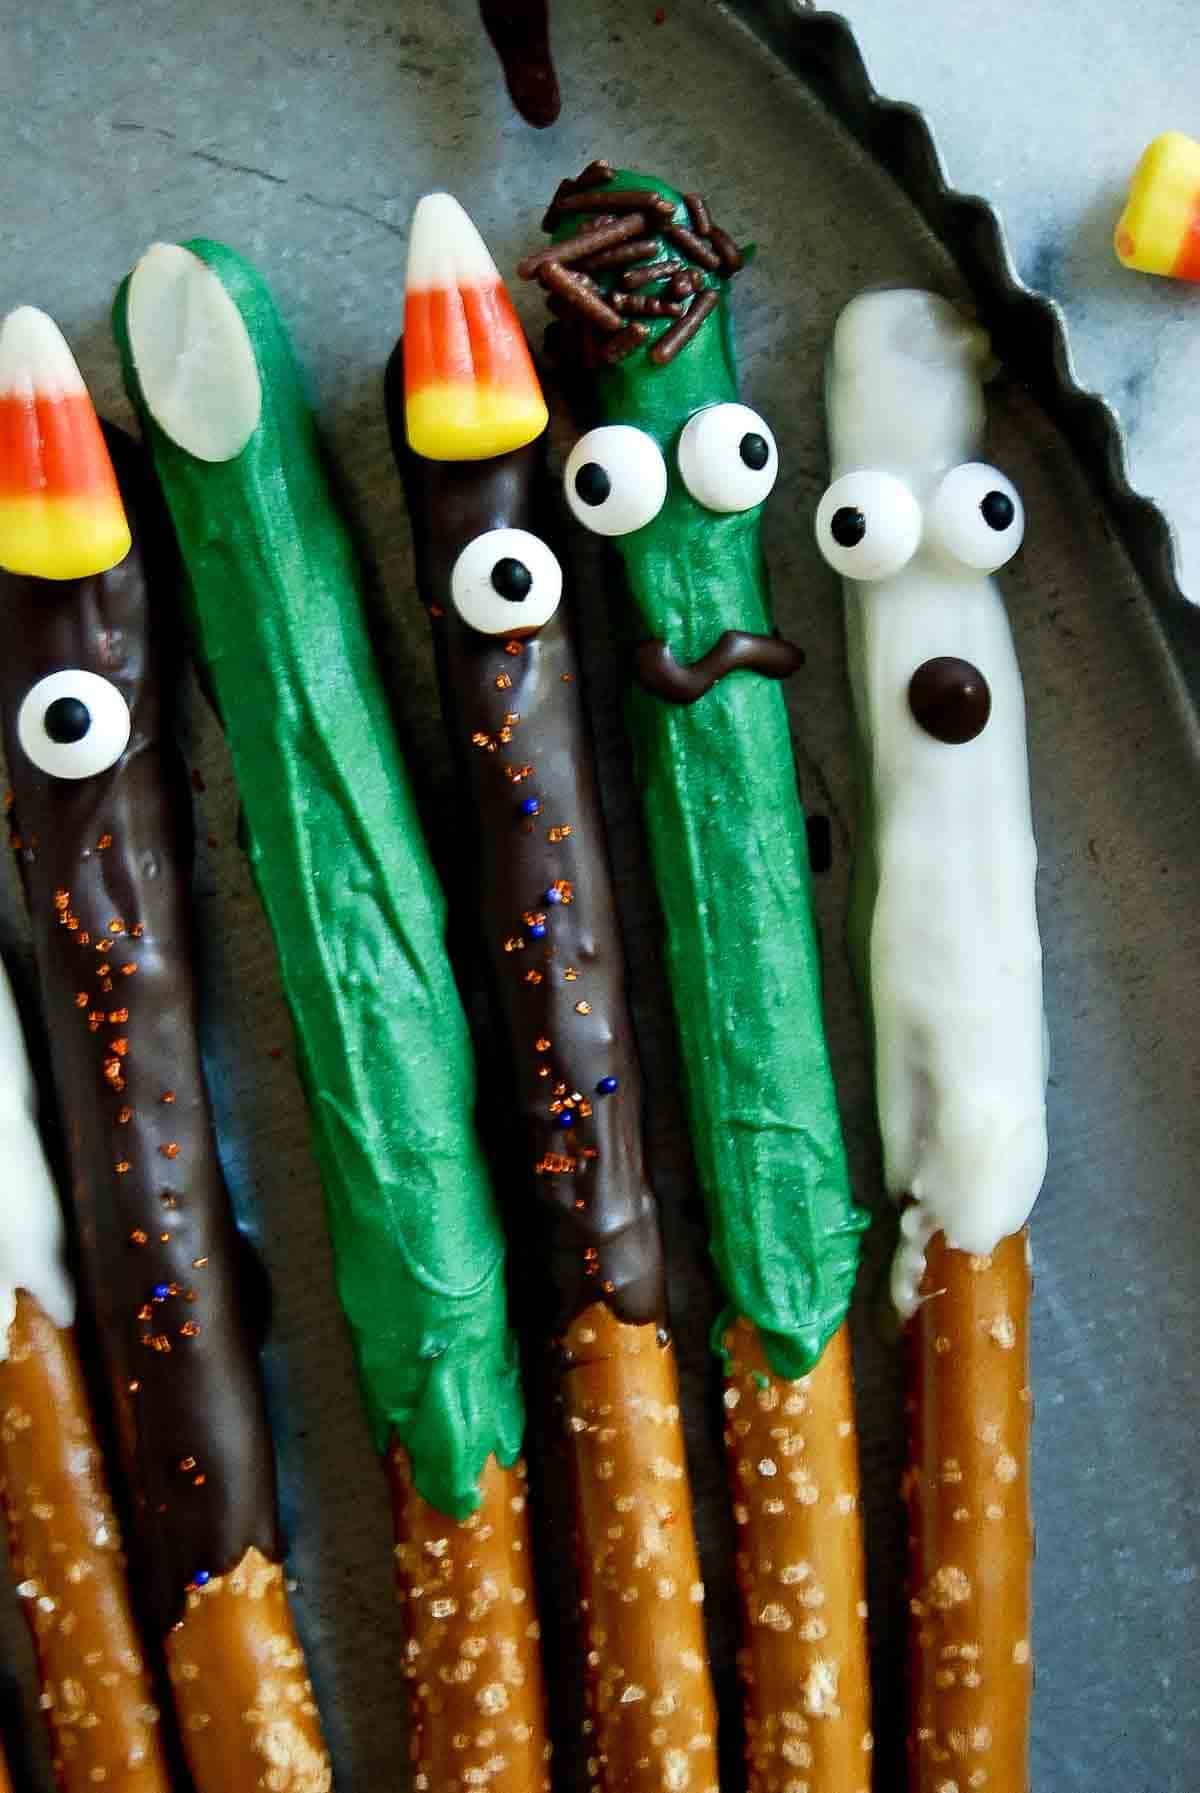
- Melted chocolate. Depending on what type of character you're making, you can choose different types of chocolate here. Purchase the melting wafers, or "candy melts" in the baking aisle and get different colors if you want to get creative! I chose dark chocolate to use for the Monster pretzel rods, green candy melts for the Frankensteins and Witch Fingers, and white candy melts for the Ghosts.
- Candy eyes. There are lots of different sizes here. I'd recommend staying on the smaller side for the candy eyeballs as the bigger, heavier ones may slide off the sides of the pretzels.
- Halloween sprinkles. Get creative with your colors here. Festive sprinkles in orange and yellow are obvious colors to choose but don't forget about purple, green, and black for some added variety!
- Slivered almonds. The slivered almonds work perfectly for the witch fingers!
- Candy corn. I used the candy corn as a "hat" for my one-eyed monsters but you could also use it as a merely decorative addition to these festive Halloween treats.
- Wax paper. This is a must - you'll want to place the chocolate-dipped pretzels on a surface to harden in the fridge and you don't want them sticking to foil or parchment paper. Wax paper is the best way to go here.
- Small microwave-safe bowls, or small saucepans. You can melt your candy melts in the microwave, or over the stove, depending on which you prefer.
- Tall skinny glass cup. This is optional, but it's helpful when dipping the pretzel rods.
- A piping bag or a small plastic bag with a small hole cut in the corner. This is helpful if you're doing any kind of design. I used the piping bag to make the mouth on the Frankenstein pretzels and on the Ghost pretzels.
How to Make These Easy Chocolate-Covered Halloween Pretzel Rods
Follow the steps below to make these perfect Halloween treats!
- Prepare Your Workspace. Cover a baking sheet or cookie sheet with wax paper or parchment paper. This will prevent the pretzel rods from sticking and make cleanup easier.
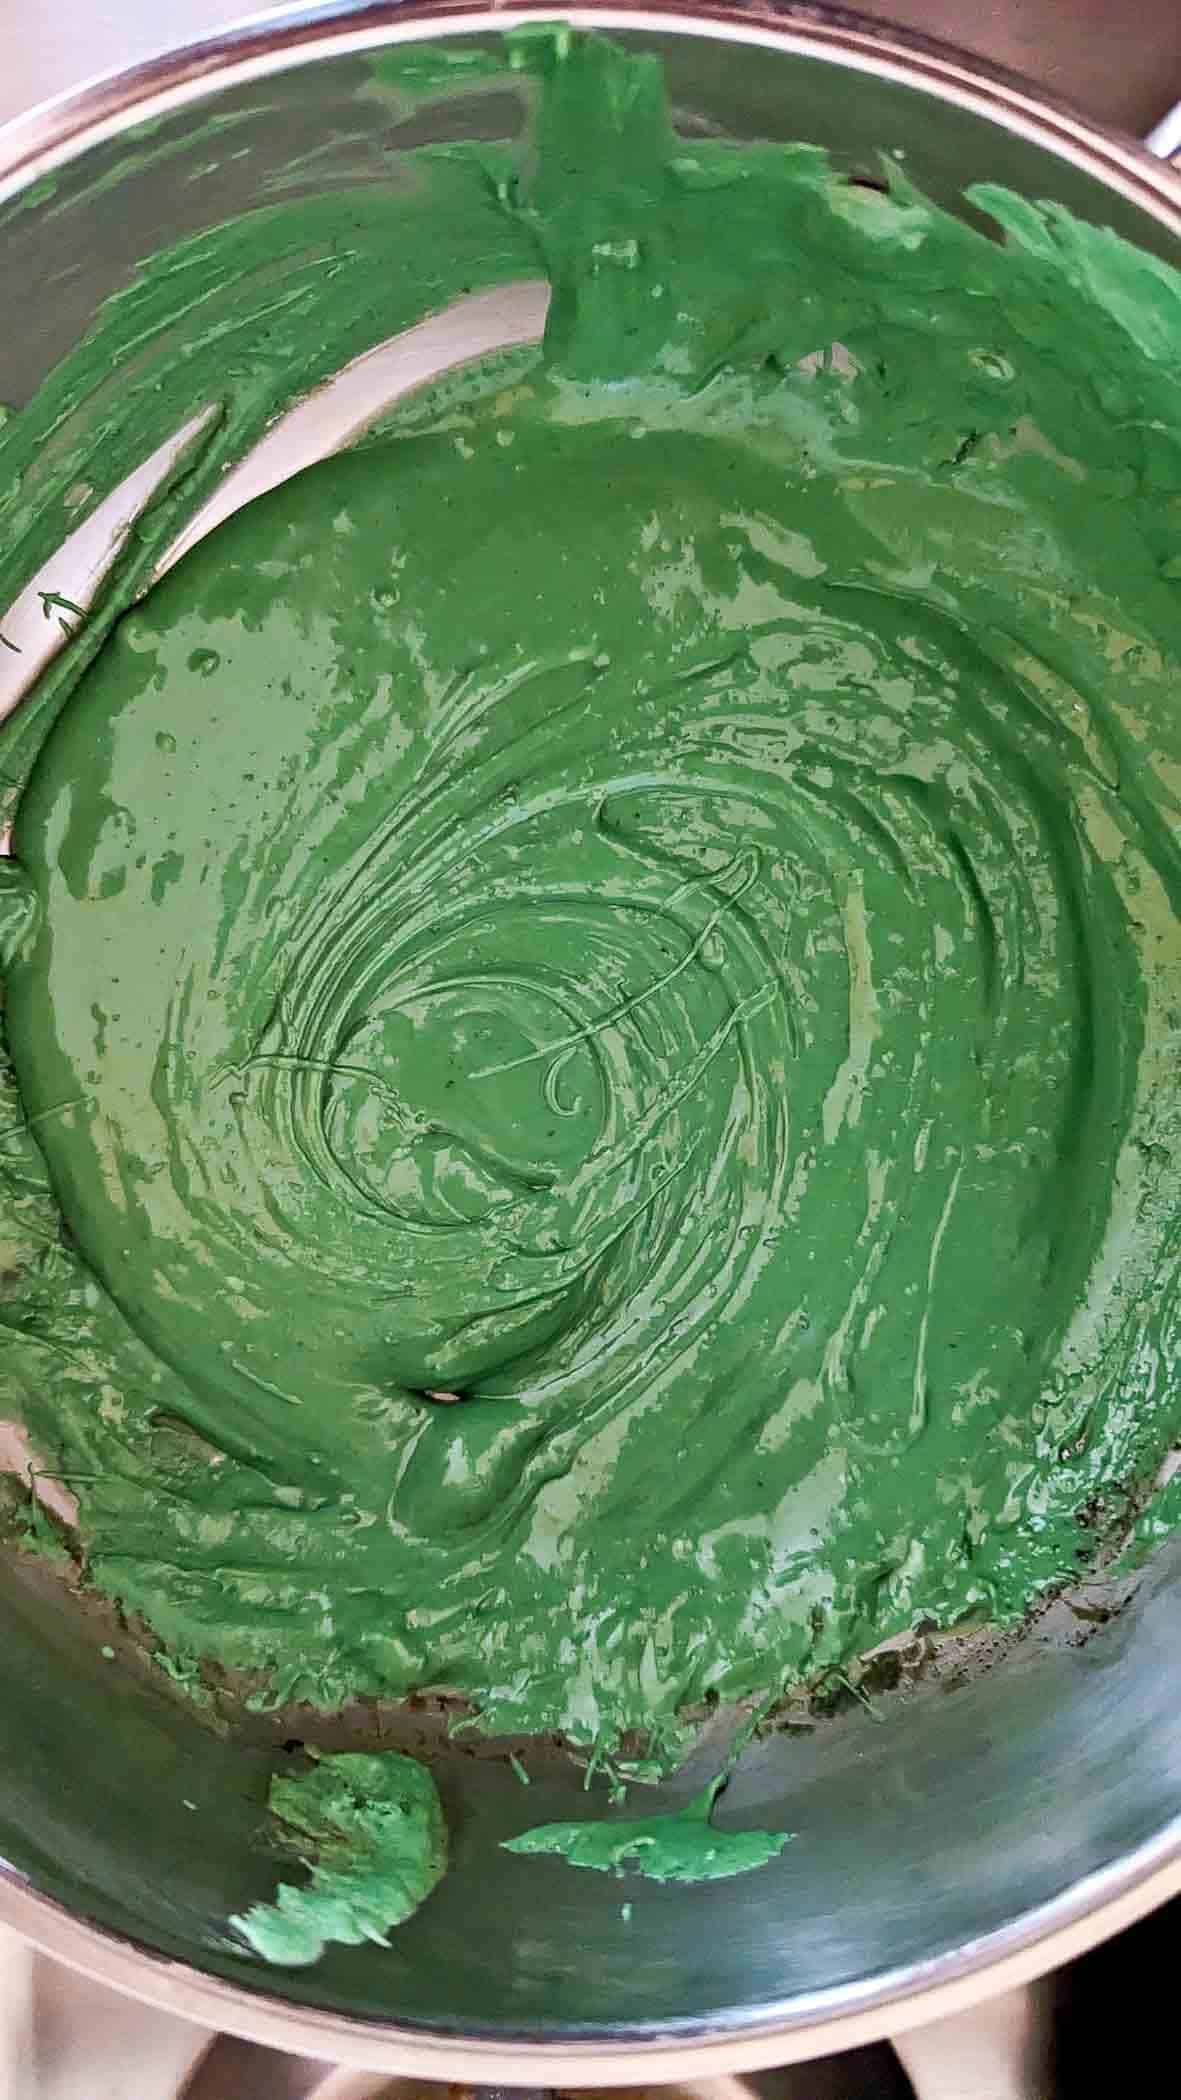
- Melt the Chocolate. In a microwave-safe bowl, melt your chosen chocolate (dark, white, or green candy melts) in 30-second intervals, stirring in between until it's smooth and completely melted. Alternatively, you can melt the chocolate in a small saucepan over low heat, stirring consistently until the chocolate has fully melted. Turn the heat off immediately once the chocolate has melted to prevent it from becoming too thick.
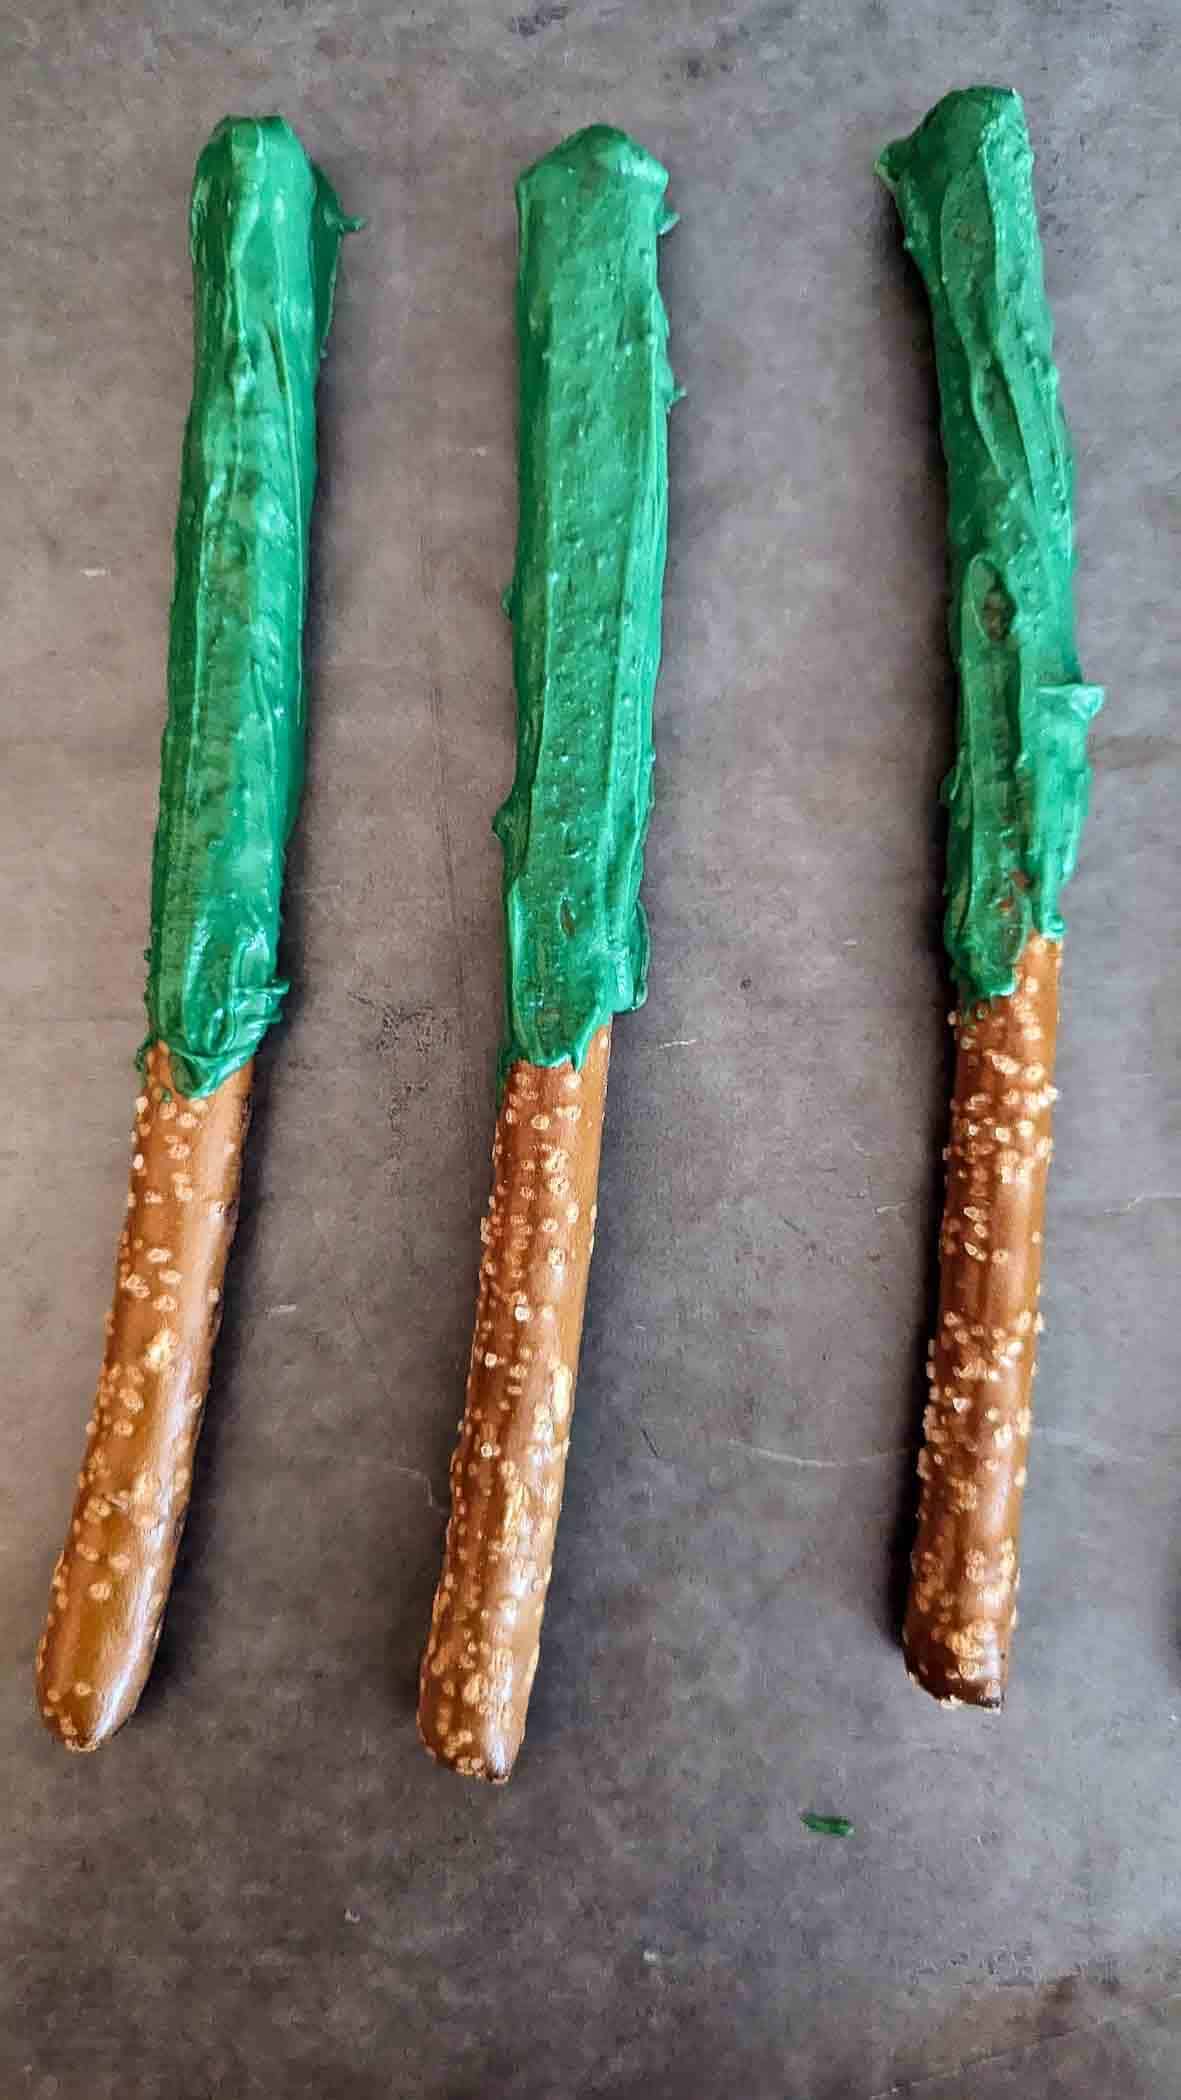
- Dip the Pretzel Rod. Dip each pretzel rod into the melted chocolate, coating it evenly. The easiest way to do this is to add the melted chocolate to a tall skinny cup, then just dip the pretzel rods in. Allow any excess chocolate drip to fall back into the cup.
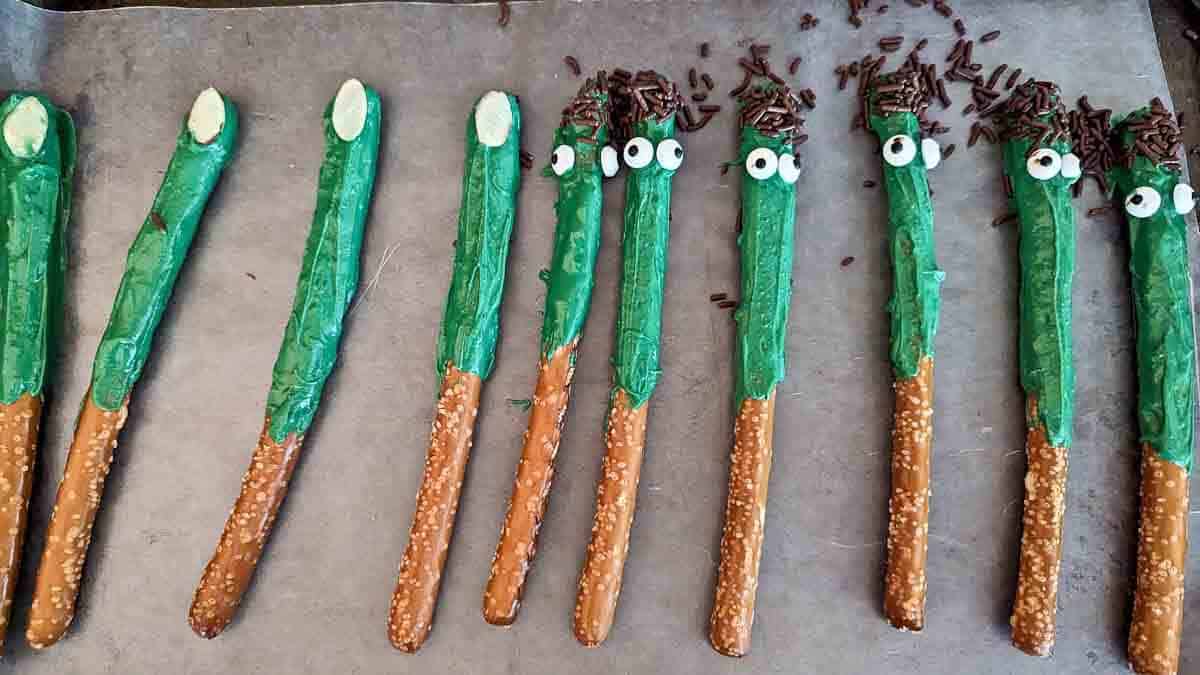
- Decorate. While the chocolate is still wet, add your decorations.
- For Witch's Fingers, attach a slivered almond to the top for a nail.
- For Frankenstein, add dark sprinkles to the top for hair and candy eyes.
- For Ghosts, use just the candy eyes, and for the Monsters, let your creativity run wild with colorful candy melts, candy corn and additional candy decorations.
- Let Them Set. Place the decorated pretzel rods on the prepared baking sheet and allow them to set. This should take about 20-30 minutes at room temperature. You can also speed this process up slightly by placing the baking sheet in the refrigerator.
- Add any extra piping. You may want to add some extra decoration to the dipped pretzel rods after they've hardened. I used the piping bag to add mouths to the Frankensteins and the ghosts.
- Serve and Enjoy. Once the chocolate is completely set, your Halloween pretzel rods are ready to enjoy. Arrange them on a festive platter or wrap them in a cellophane bag for party favors or Trick or Treat handouts.
Variations
Here are some ideas for different Halloween-themed pretzel rods:
- Witch Finger Pretzel Rods: Create creepy Witch's Fingers by adding slivered almonds as nails to green chocolate-coated pretzel rods.
- Ghostly Pretzel Rods: Make friendly ghosts by adding candy eyes to the top of the pretzel rods and a simple round mouth with a piping bag of dark chocolate.
- Frankenstein Pretzel Rods: Turn your pretzel rods into mini Frankensteins by adding black sprinkles for the hair, candy eyes, and then a simple lined piping of dark chocolate for the mouth.
- Monster Pretzel Rods (or general fall/Halloween theme): Let your imagination run wild with Monster-themed pretzel rods using colorful candy melts and assorted candy decorations like sprinkles, extra candy eyes, and candy corn.
Helpful Tips
- Use a tall glass or cup to dip the pretzel rods. This makes it easier to coat them evenly.
- Follow melting instructions. When using candy melts, follow the package instructions for melting to ensure a smooth consistency. For instance, the brand that I used said that continuing to heat the candy melts after they have already melted would result in the chocolate becoming too thick, making it hard to dip the pretzels in.
- Don't let the chocolate-dipped pretzels sit for too long before adding your decorations! The longer they sit, the harder it will be to get the decorations to adhere to the chocolate. I dipped about 4-5 pretzels, then decorated them first before finishing up each color. I also waited to melt each color of chocolate separately so that they wouldn't harden too quickly before I was able to get to each one. Hint: If following my examples, melt the dark chocolate last, as you'll also use that for the mouths after the Frankensteins and the Ghosts have hardened.
- Let your creative juices flow! Experiment with different colors and decorations to suit your Halloween theme.
- Store them properly. Store your finished pretzel rods in an airtight container in the refrigerator to keep them fresh.
Frequently Asked Questions
You can usually find candy melts in craft stores or the baking section of your local grocery store. They come in a variety of colors to suit your needs.
While candy melts are designed for this type of recipe, you can use regular chocolate if you prefer. Just make sure to temper the chocolate properly for the best results. Know that regular chocolate chips may also harden more quickly than the candy melts.
Yes, you can make these pretzel rods a day or two in advance. Store them in an airtight container at room temperature or in the refrigerator.
Sure! I would recommend using pretzel sticks unless you're purely adding sprinkles as larger items like candy eyes and candy corn will have a hard time adhering to the smaller surface.
Store the pretzels in an airtight container in the refrigerator for up to 1 week.

Making Chocolate-Covered Halloween Pretzel Rods is the perfect way to celebrate the spooky season. This easy treat is not only a great addition to a fun Halloween party or a kid's class party but it's also a great activity for the whole family to enjoy together (my kids had so much fun helping with these!)
So, get creative and let your imagination run wild as you whip up this cute snack for your favorite holiday! Happy Halloween!
If you make these Halloween Pretzel Rods, let me know what you think in the comments. And don't forget to tag me with a pic @frontrangefed on Instagram - I love to see your creations!
More Fun Fall Treats
- Baked Apple Chips With Maple Tahini Dressing
- Pumpkin Cookies With Cream Cheese Icing
- Halloween Candy Monster Cookies
- Easy Peanut Butter Blondies
- Brown Butter Rice Krispie Treats
- Easy Moist Pumpkin Bread With Chocolate Chips
- Snickerdoodle Bars
- Chocolate Covered Peanut Butter Pretzels
- Spooky Halloween Chocolate-Covered Strawberries
Recipe
Chocolate-Covered Halloween Pretzel Rods (Easy Recipe!)
Ingredients
- 30 pretzel rods
- 30 oz chocolate candy melts (I used about 10 oz each of dark chocolate, white chocolate and green chocolate candy melts)
- 1 package Halloween sprinkles
- 40 candy eyes
- 10 slivered almonds
- 15-30 pieces candy corn
Instructions
- Prepare a large baking sheet by placing a sheet of wax paper over the top. This is where you will place your dipped pretzel rods.
- Make the Witch's Fingers and Frankenstein pretzel rods first. Melt the green chocolate in a small saucepan or in the microwave (follow the melting instructions).
- Place the melted chocolate into a tall cup, then dip each pretzel into the cup, allowing any excess chocolate to fall back into the cup.
- Place the chocolate-dipped pretzel rods on the wax paper.
- For the Witch's Fingers, place a single slivered almond onto the top to serve as the fingernail. For the Frankensteins, add black sprinkles to the top of the pretzels and then add the candy eyes.
- Next, make the Ghosts. Melt the white chocolate according to the packaging, then, following the instructions above, add it to a tall cup and dip your pretzels into the cup.
- Add the candy eyes to the Ghost pretzels and set aside.
- Finally, make your Monster pretzels. Melt the dark chocolate according to the package instructions, then add it to a tall cup and dip your remaining pretzel rods.
- Use your imagination to create Halloween Monster pretzels. Add sprinkles, extra candy eyes, candy corn, or other Halloween candies to the pretzels.
- Add the remaining melted dark chocolate to a piping bag and create mouths on the Frankensteins by adding a thin squiggly line. Create mouths on the Ghost pretzels by adding a simple oval or circle.
- Allow all the pretzels to set for 20-30 minutes at room temperature to harden. (Or place them in the refrigerator for 15-20 minutes.)
Notes
- Use a tall cup to place the melted chocolate in and dip the pretzel rods in that for easy coverage.
- Place the dipped pretzel rods on wax paper when allowing to harden.
- Don't let the chocolate harden too quickly before decorating, or else your decorations won't stick.
- Get the chocolate to harden faster by placing the baking tray of chocolate-dipped Halloween pretzel rods in the refrigerator.
Trish says
We did a practice run of these pretzel rods ahead of the Halloween season and my kids had a blast making them and then biting off their heads. These will definitely make an appearance at our annual Halloween party this year!
Sarah Jenkins says
Awesome! So glad you liked them Trish!
Pam says
I like to make Halloween treats and this one was so great! Easy and delicious, and of course the kids thought they were awesome.
Sarah Jenkins says
glad you liked them Pam!
Melanie says
I love how this recipe combines the irresistible combination of sweet and salty, and I got to get a little crafty with the designs. I made them into mummies and my kiddos loved them!
Sarah Jenkins says
LOVE the mummy versions!
Blake says
Oh my goodness, my kids LOVE these! It was such a fun recipe to make together after school. So tasty!
Sarah Jenkins says
yes! they are so fun to make with kids!
Reese says
This recipe was a fun, tasty and enjoyable bonding moment with my doctor. We really had fun decorating plus it was delicious too. Excited to have this for Halloween parties.
Sarah Jenkins says
so glad you liked them!