
This delicious, incredibly easy No-Knead Rosemary Parmesan Bread recipe is the perfect place to start your bread-making journey. Delicious golden crust, big, beautiful artisanal-style holes in the crumb, and incredible taste. This is such a delicious, easy Parmesan bread recipe! I promise, once you try it and see how easy it is, you'll never want to buy bread from the store again!
Picture this: It's a snowy Colorado night in late November. You have a steaming hot pot of homemade chili on the stove. A tall glass of red wine in your hand. And, what's this? Delicious, homemade fresh rosemary and parmesan bread, piping hot from the oven, on the table. It's not a dream, my friends, this happened at my house, on a weeknight, just this past week. And it can happen to you, too.
(Note - if you're looking for an incredible main to serve this bread with, this Sunday Pot Roast Dinner is amazing!)
Intimidated by making homemade bread? Don't be! Homemade bread is incredibly easy, and this no-knead rosemary bread recipe makes it even easier. If you haven't hopped on the no-knead bread train yet, consider this your sign. It's the perfect way to spend a cold afternoon indoors and honestly, doesn't take a lot of time (active time, that is).
In This Post
What Makes This Parmesan Rosemary Bread So Great?
- Easy. This is a super duper EASY bread recipe and really does not take that much time to make. Seriously - no kneading, no stand mixture needed (unless you want to use it), only a few minutes of active effort. Just a handful of ingredients. This fresh rosemary bread recipe is incredible and can easily be made on a busy weeknight.
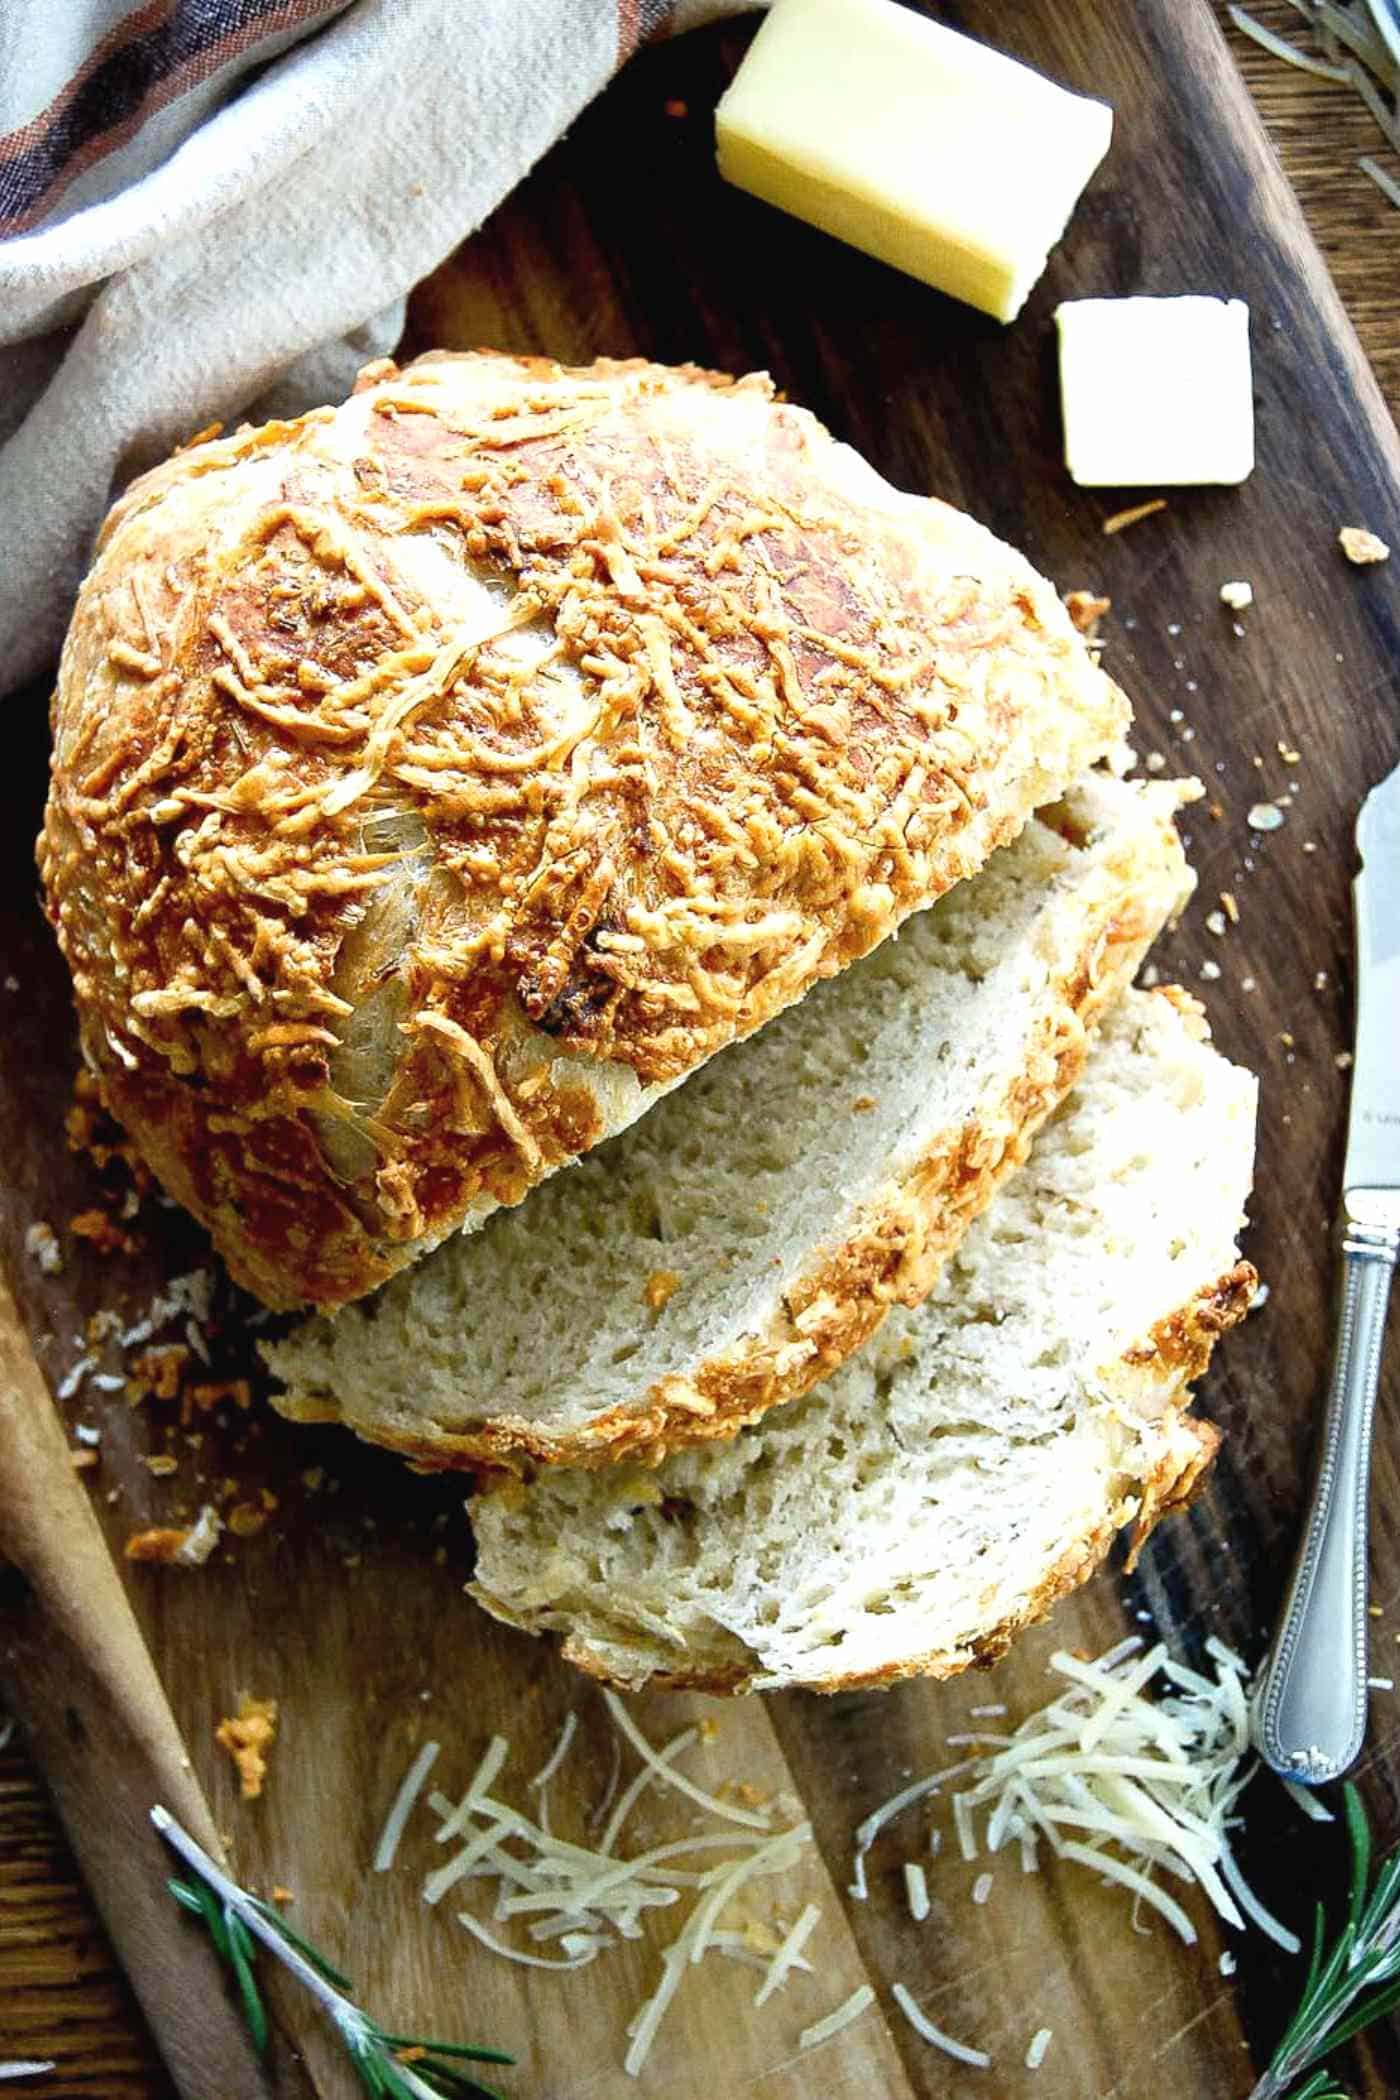
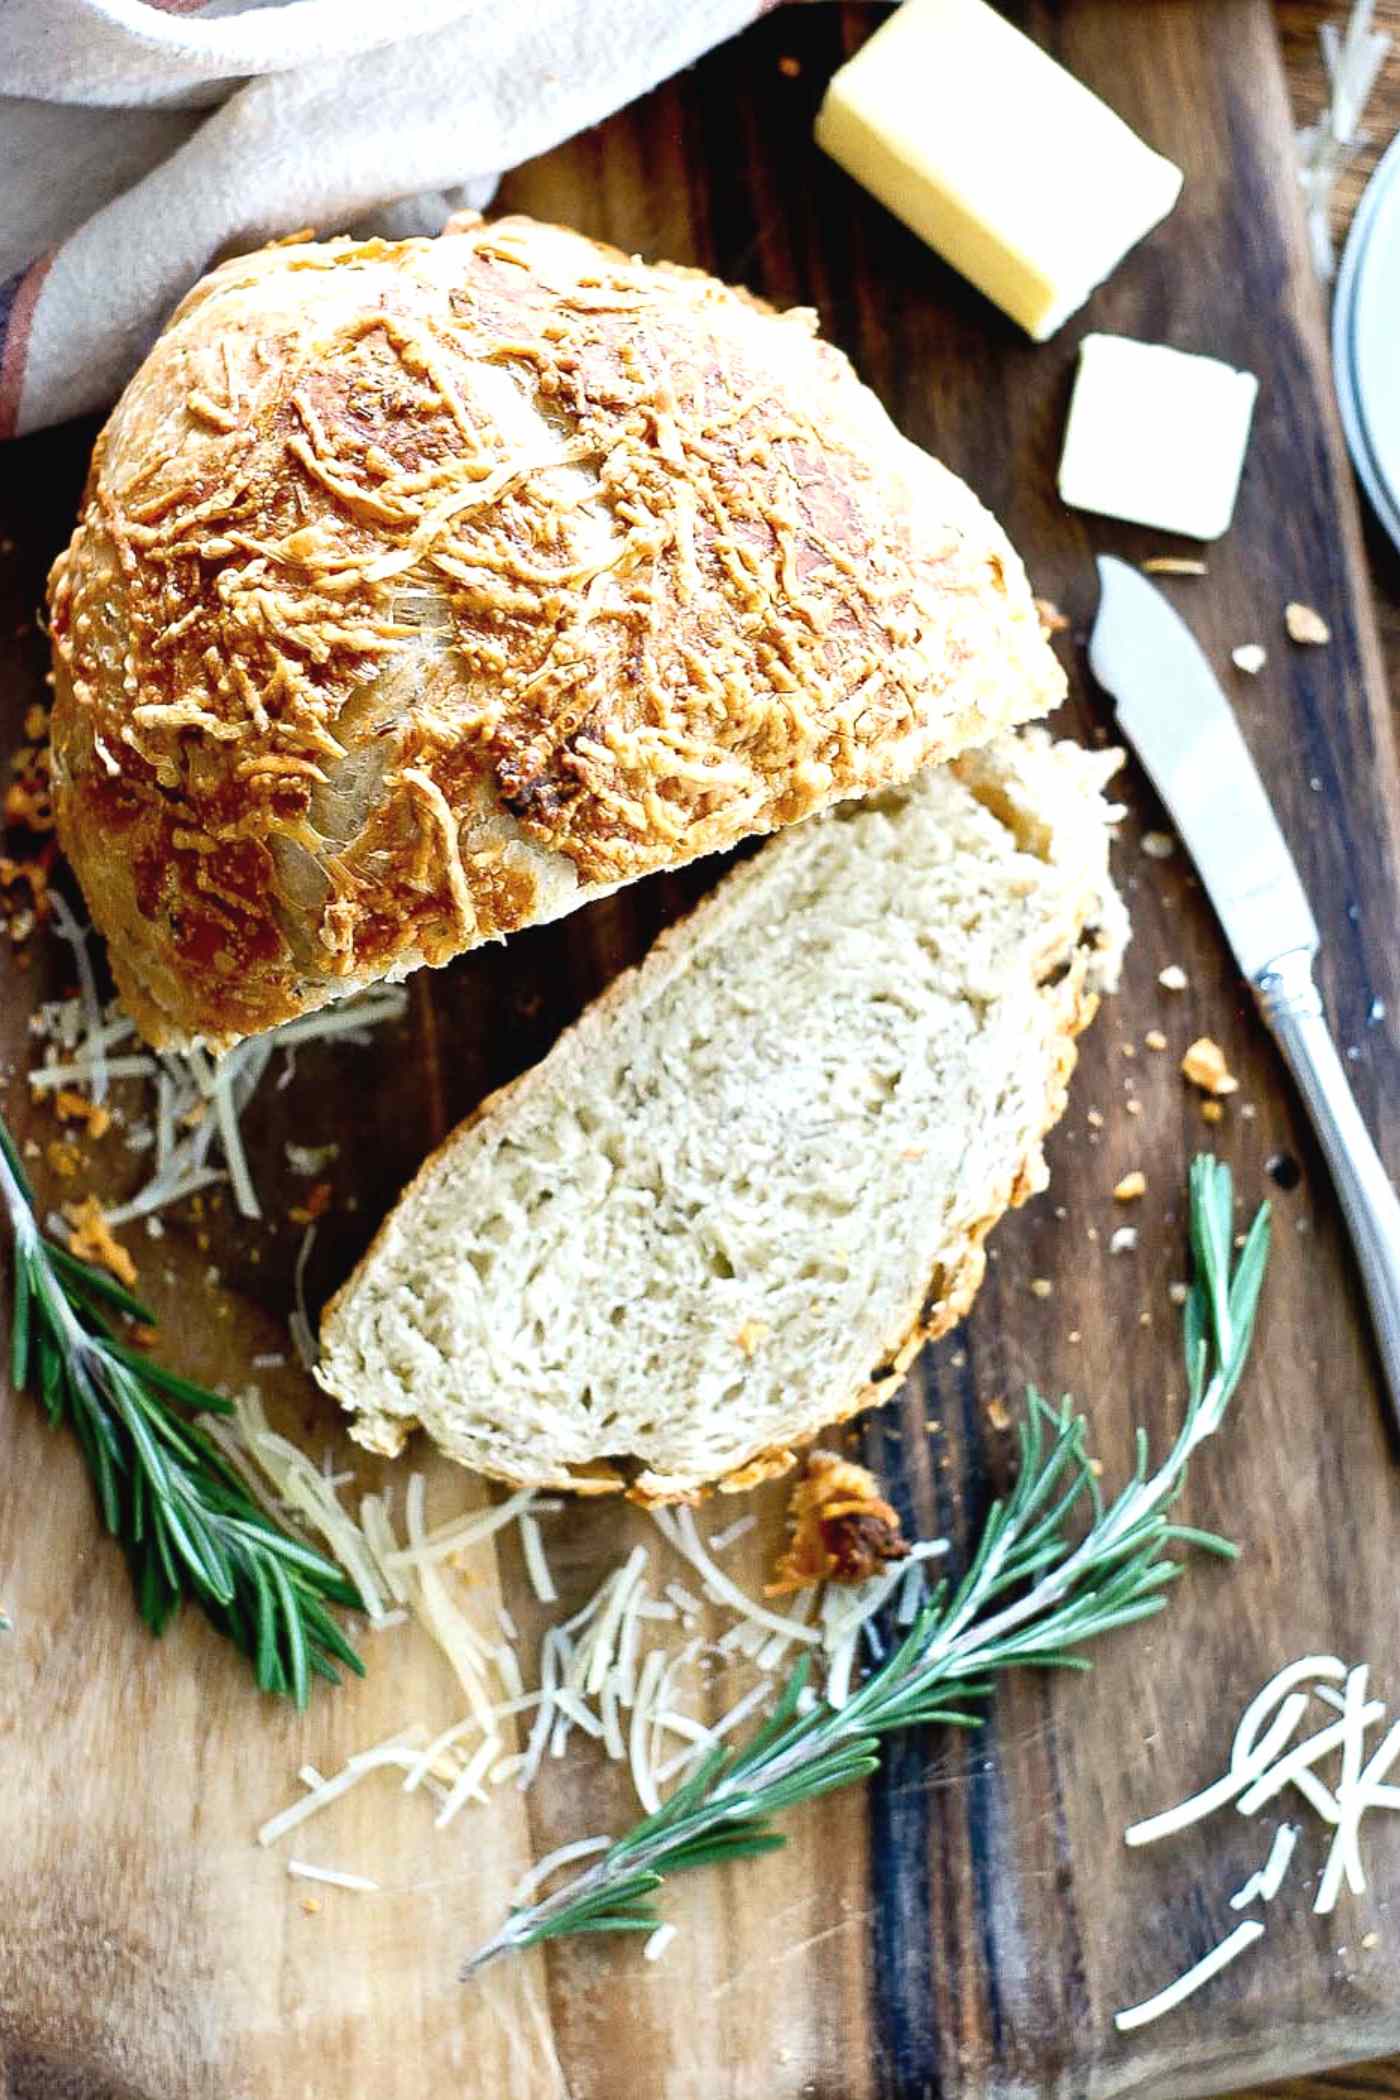
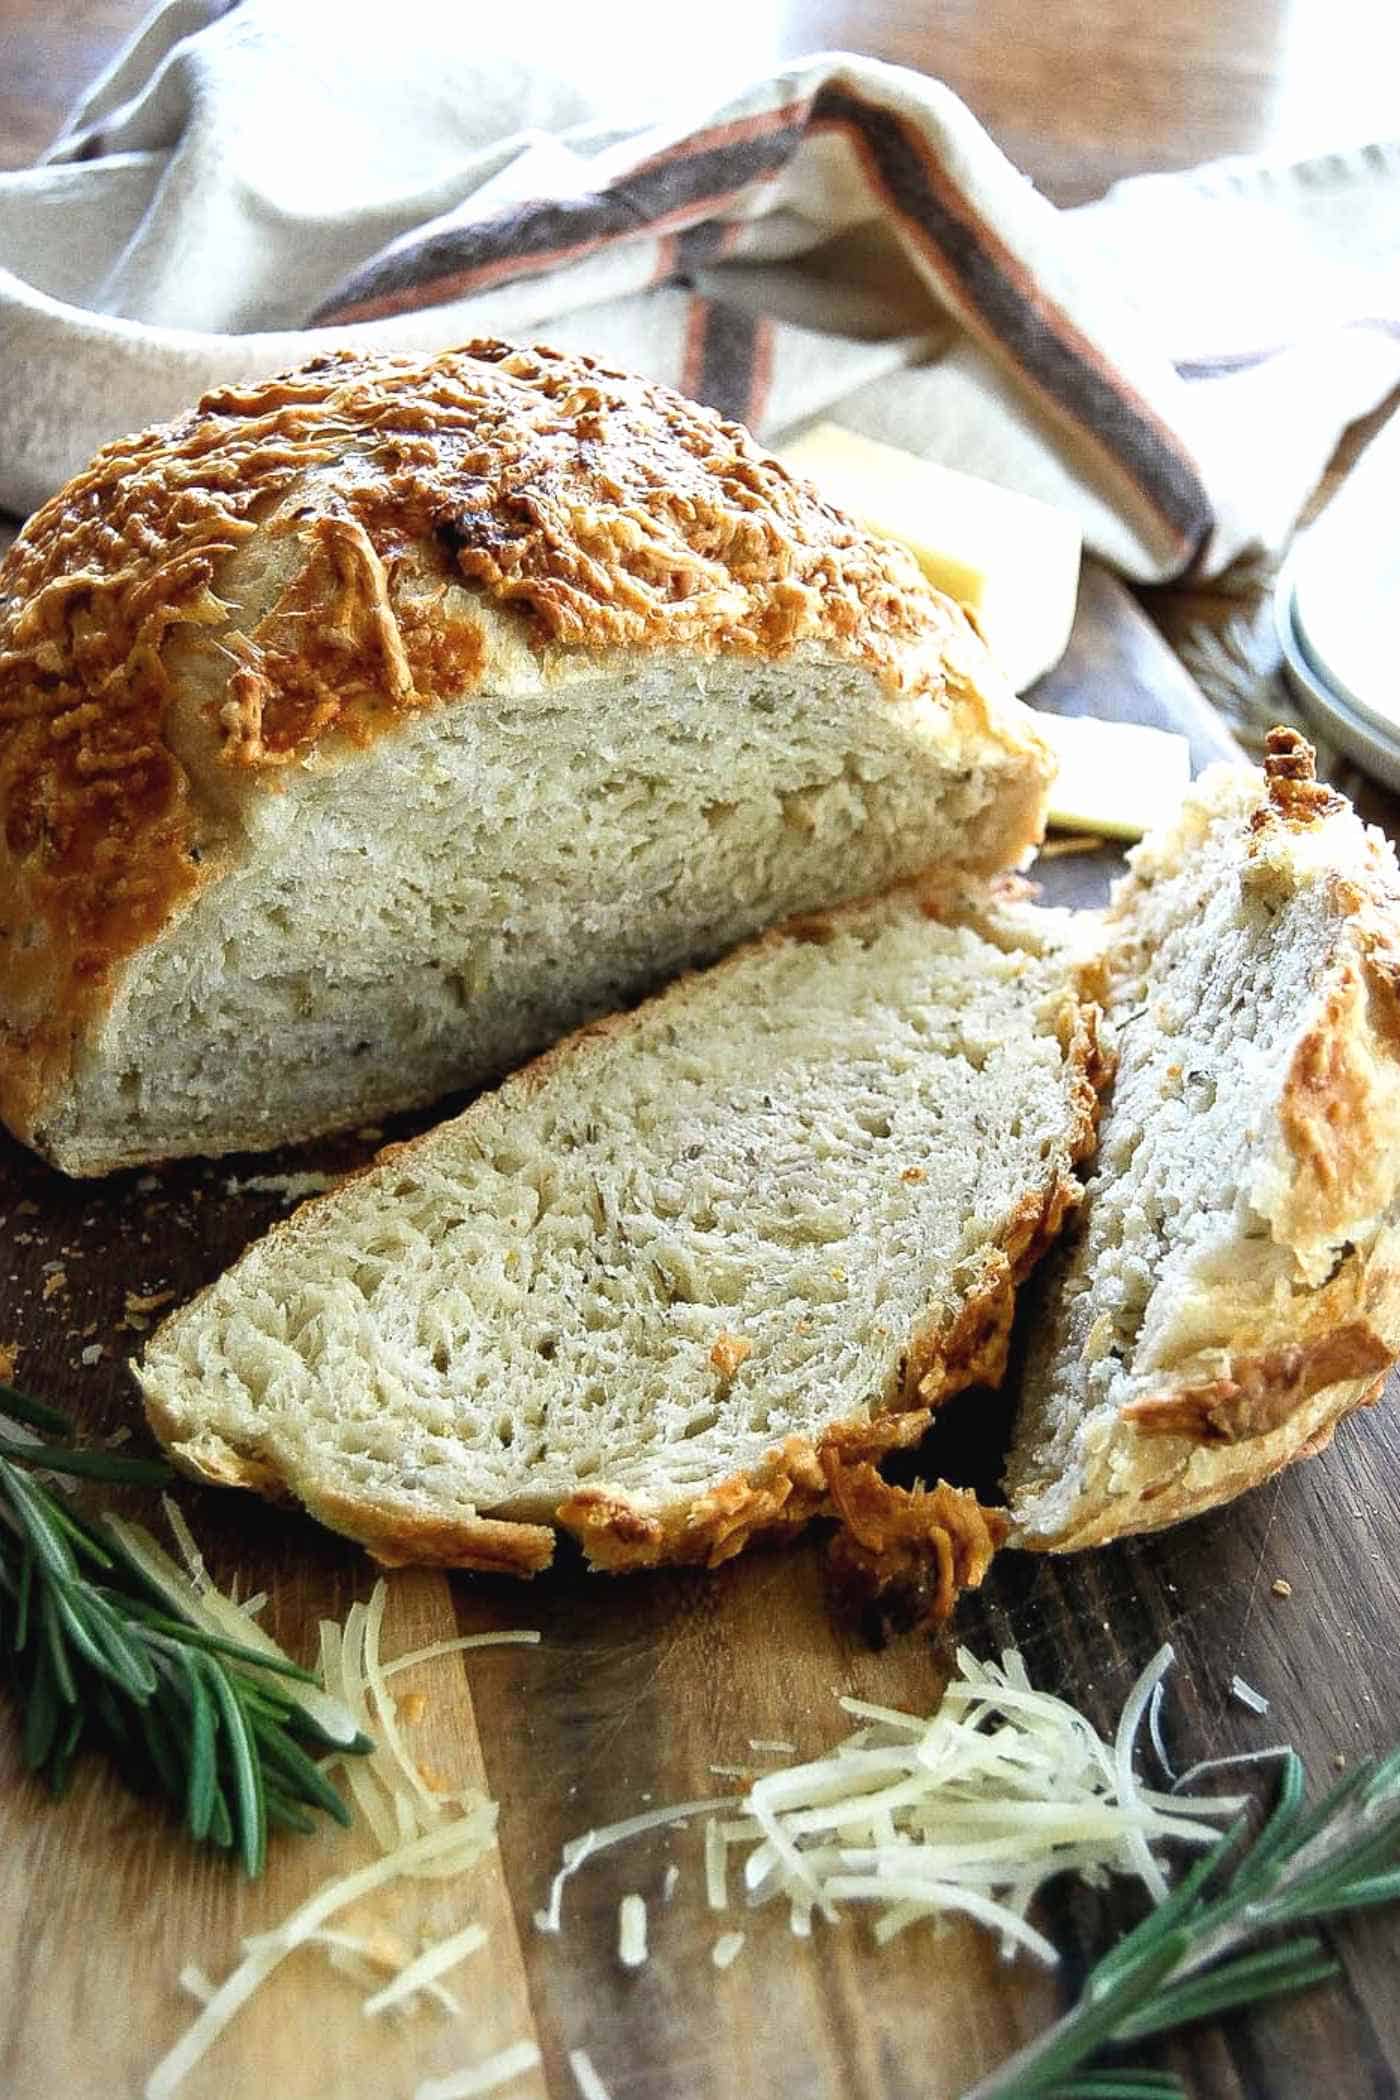
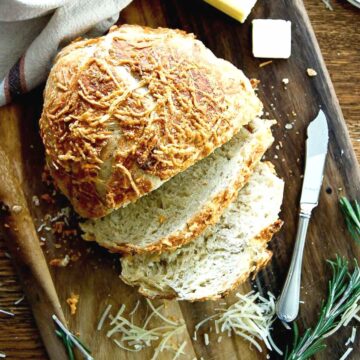
- Amazing texture. Perfect textured yeast bread with minimal effort. I'm talking a golden, crispy crust, and a moist interior with artesian-style holes in the crumb.
- Incredible taste. This bread base, without the rosemary and Parmesan is delicious, but these two add-ins make it a phenomenal, extra special savory herb and cheese bread that has the best flavor. It's also a great side to accompany soups (this Chicken And Sausage Gumbo, Split Pea Soup or Instant Pot Chicken Noodle Soup goes perfectly with it!) or pasta dishes (love it with this Spaghetti And Meatball Casserole and my simple Frozen Ravioli Lasagna Recipe)
- The cheese! Parmesan cheese bread is a great way to experiment with cheesy bread. It's not too melty and adds an incredibly rich and slightly salty taste to this easy yeast bread.
- Hands off! A longer rise time makes this rosemary parm bread pretty hands-off. But it also allows the flavors to really develop over time, yielding a truly delicious taste. I've even let it rise for as long as 24 hours and it's turned out beautifully.
- Smells amazing! Warning: when baking this no-knead rosemary parmesan bread, your house will smell incredible. And likely, your friends and family will fall to their knees to thank you for serving them such a delicious masterpiece. This rosemary parmesan bread is so good and so easy, you'll never want to buy bread from the store again!
Ingredients
I love homemade bread not only for its taste and texture but for its simple ingredients and add-ins. This rosemary parmesan bread requires just a few ingredients, most of which you probably have on hand.
- Instant yeast - you only need ¼ of a teaspoon for this recipe - this is not even a whole packet, so you can make tons of bread with just one envelope of instant yeast!
- All-purpose flour - you can use bread flour too, but all-purpose flour seriously works beautifully here.
- Fine sea salt, to bring out the taste
- Rosemary - you can use dried rosemary, or fresh, or a combination (dried in the dough/fresh sprinkled on top, which is what I did here.) The fresh taste of this rosemary bread cannot be beaten.
- Parmesan cheese - the cheese in this rosemary parm bread gives it a slightly saltier taste and sharper flavor.
How To Make Rosemary Parmesan Bread
Ok. Making this rosemary bread is really, really easy.
- To start, just mix the dry ingredients - the flour, yeast, sea salt, and rosemary together in a large bowl, or the bowl of your stand mixer. You don't even need to mix the yeast with water ahead of time since it's instant.
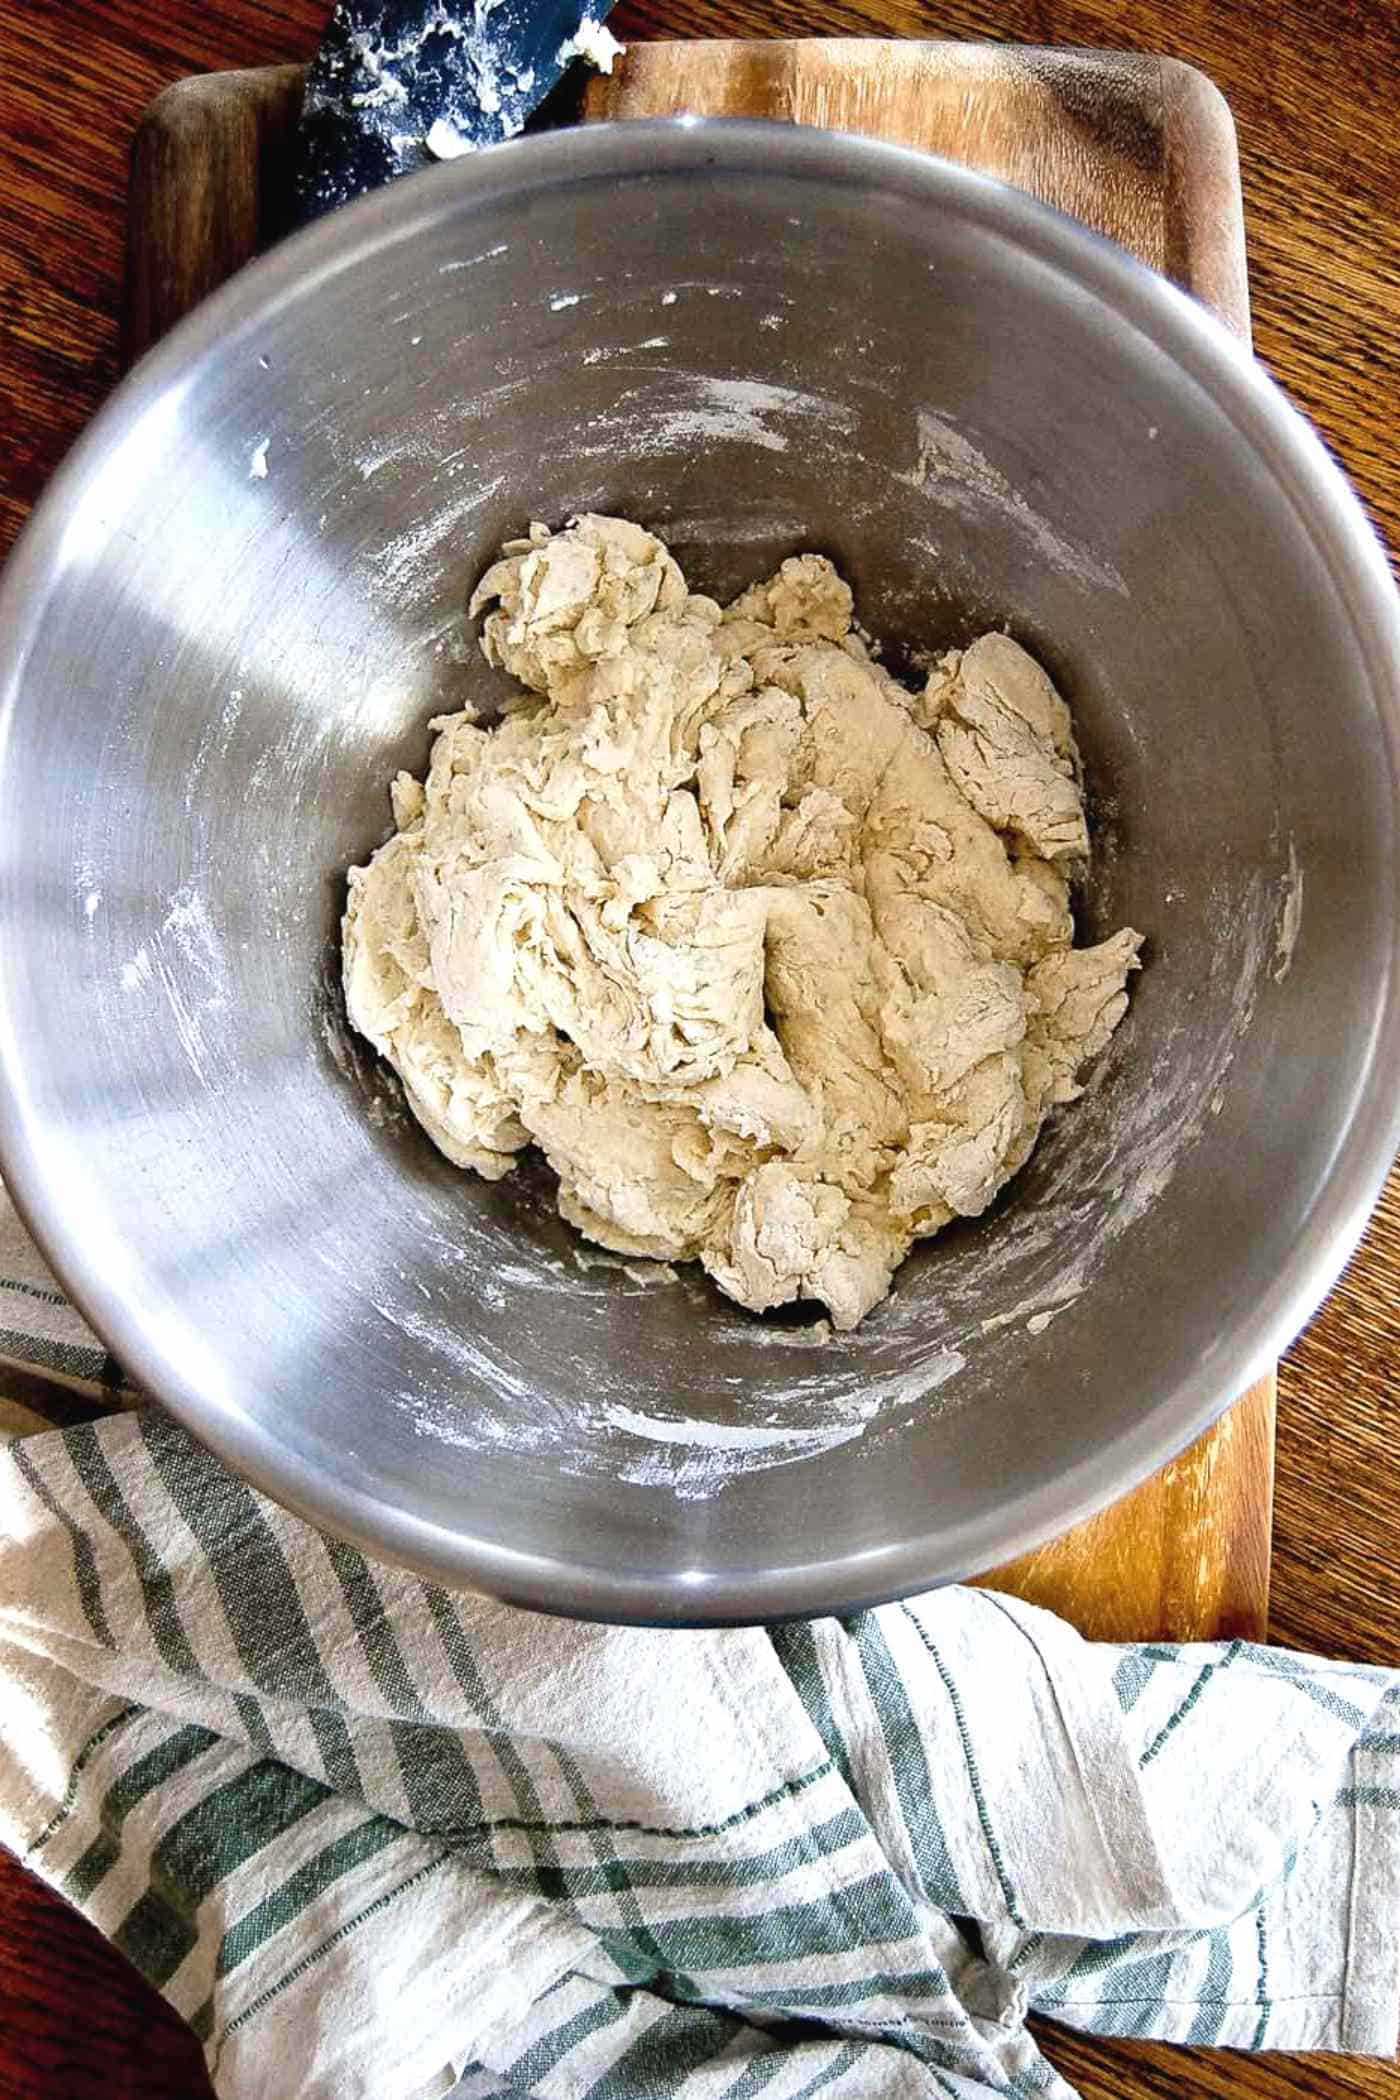
- Add the warm water and mix your dough until a shaggy dough forms (do this by hand on a lightly floured surface, or, if using the stand mixer, use your dough hook on medium speed). This dough will seem a little dry and shaggy, which is just as it should be. Don't worry about how it looks at this point - just let it be and do its thing.
- Cover the bread dough with a clean tea towel and let it rise at room temperature for 12-18 hours. Note: While you'll get amazing results even with a 1-2-hour rise, the longer the dough rises, the longer the flavors have to blend together. This means that you'll have a richer-tasting bread, and the texture will be better the longer you let it sit (a 3-4 hour rise produces amazing results!).
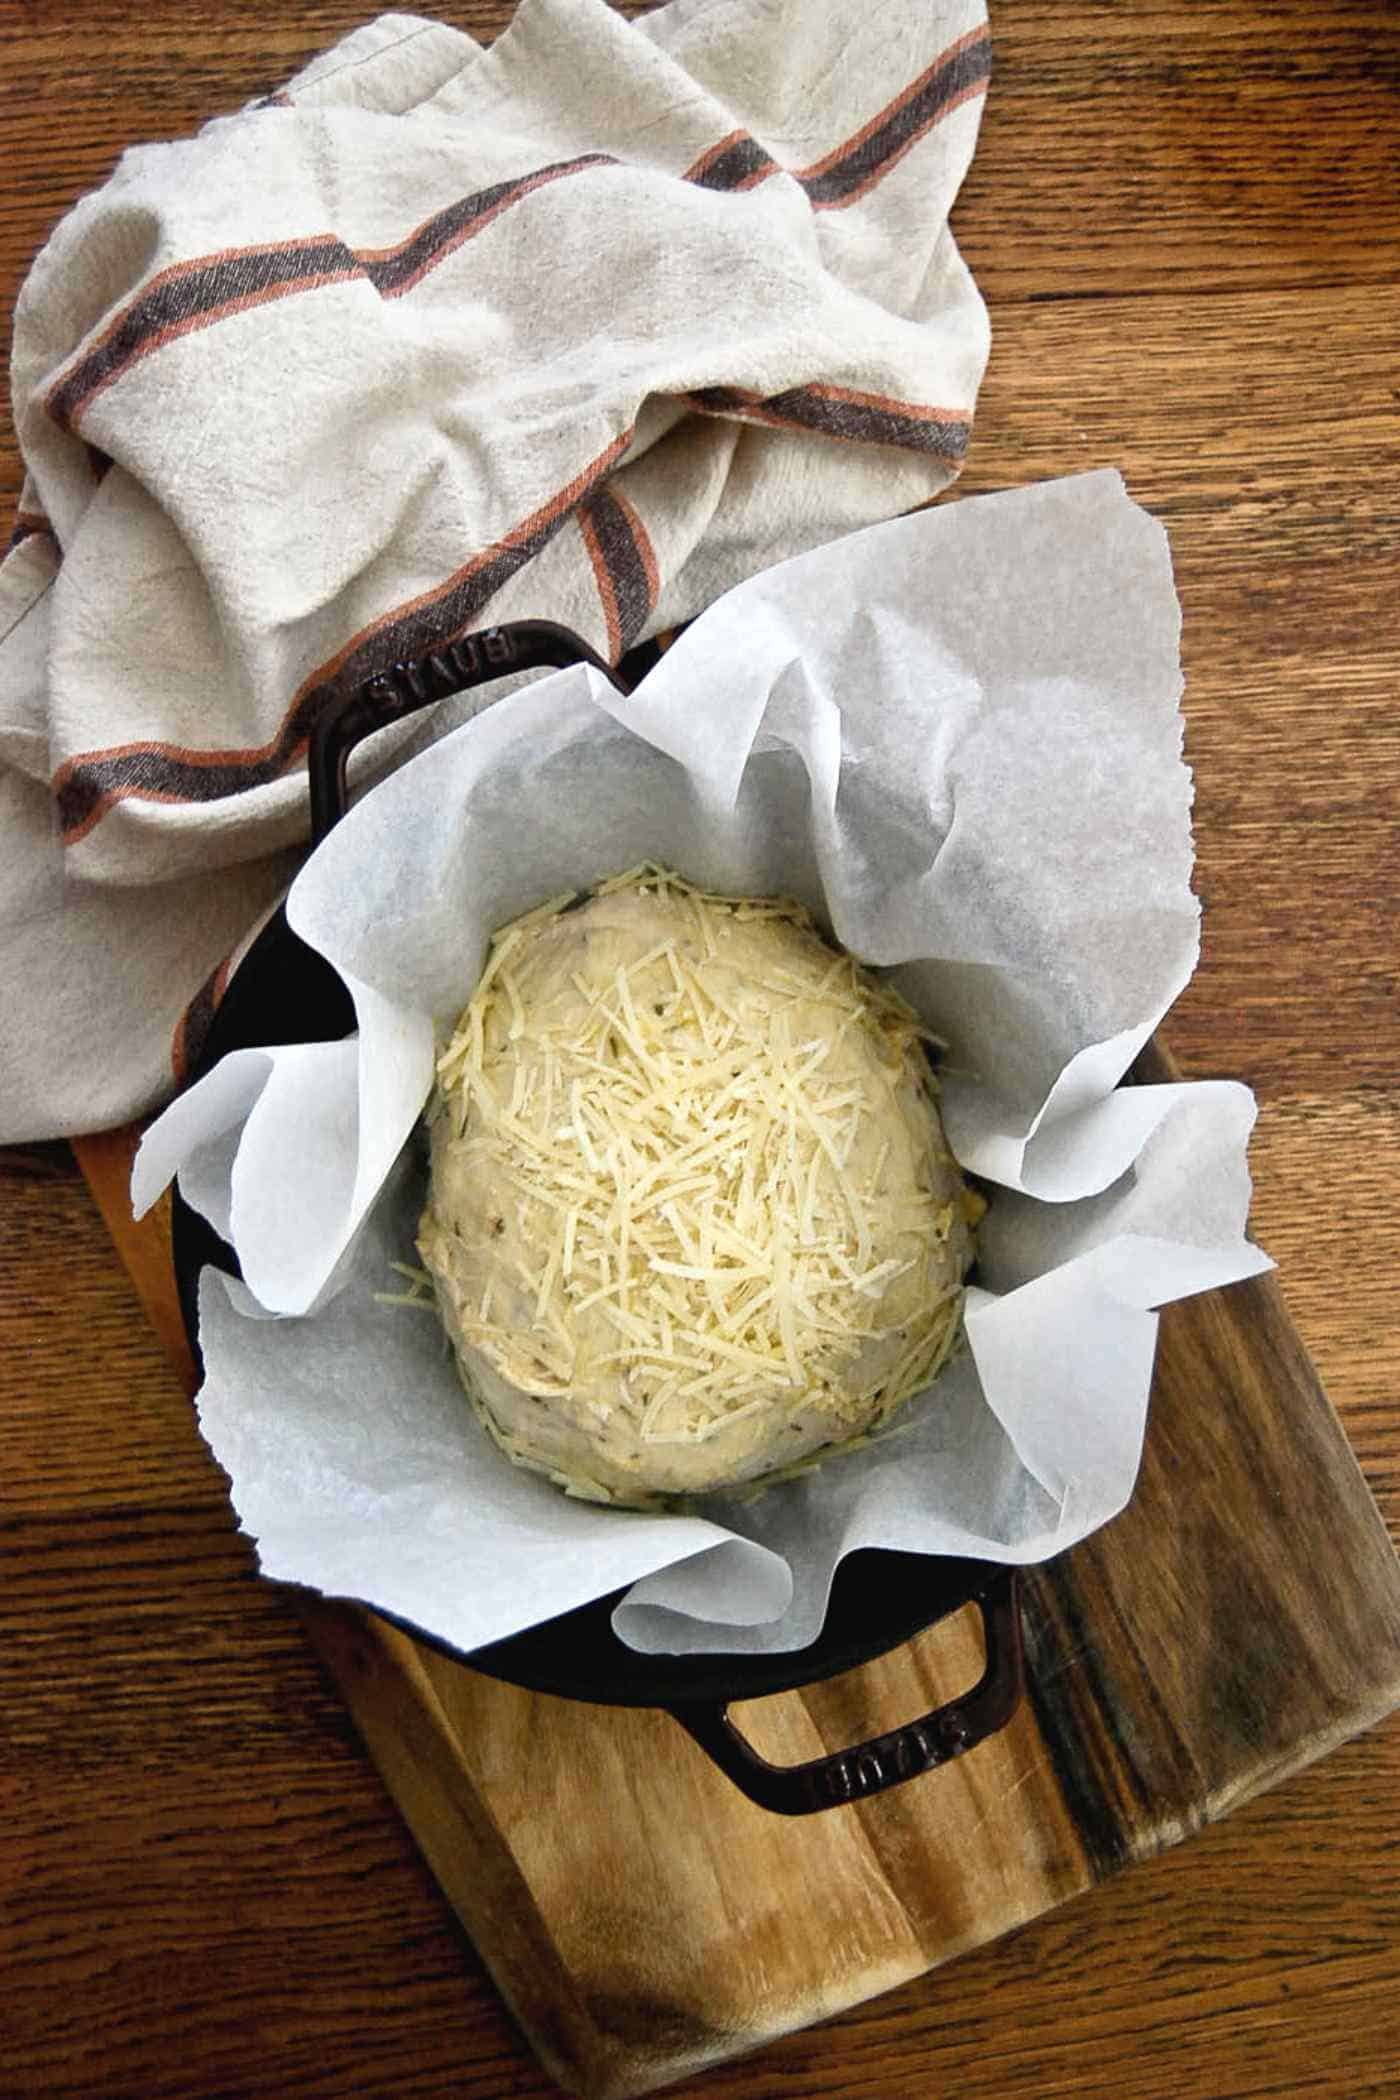
- Once the dough has risen, shape it into a round loaf. Place a piece of parchment paper on the counter, lightly dust it with flour, then place your dough on top. Lightly flour the top of the dough, then tuck the sides under the dough to form a ball. Cover the dough again and let it rise a second time while your oven preheats.
- Place a Dutch oven, or a baking dish in your cold oven and set it to 450 degrees. Allowing the cooking vessel to heat with the oven helps to give your bread rise a boost.
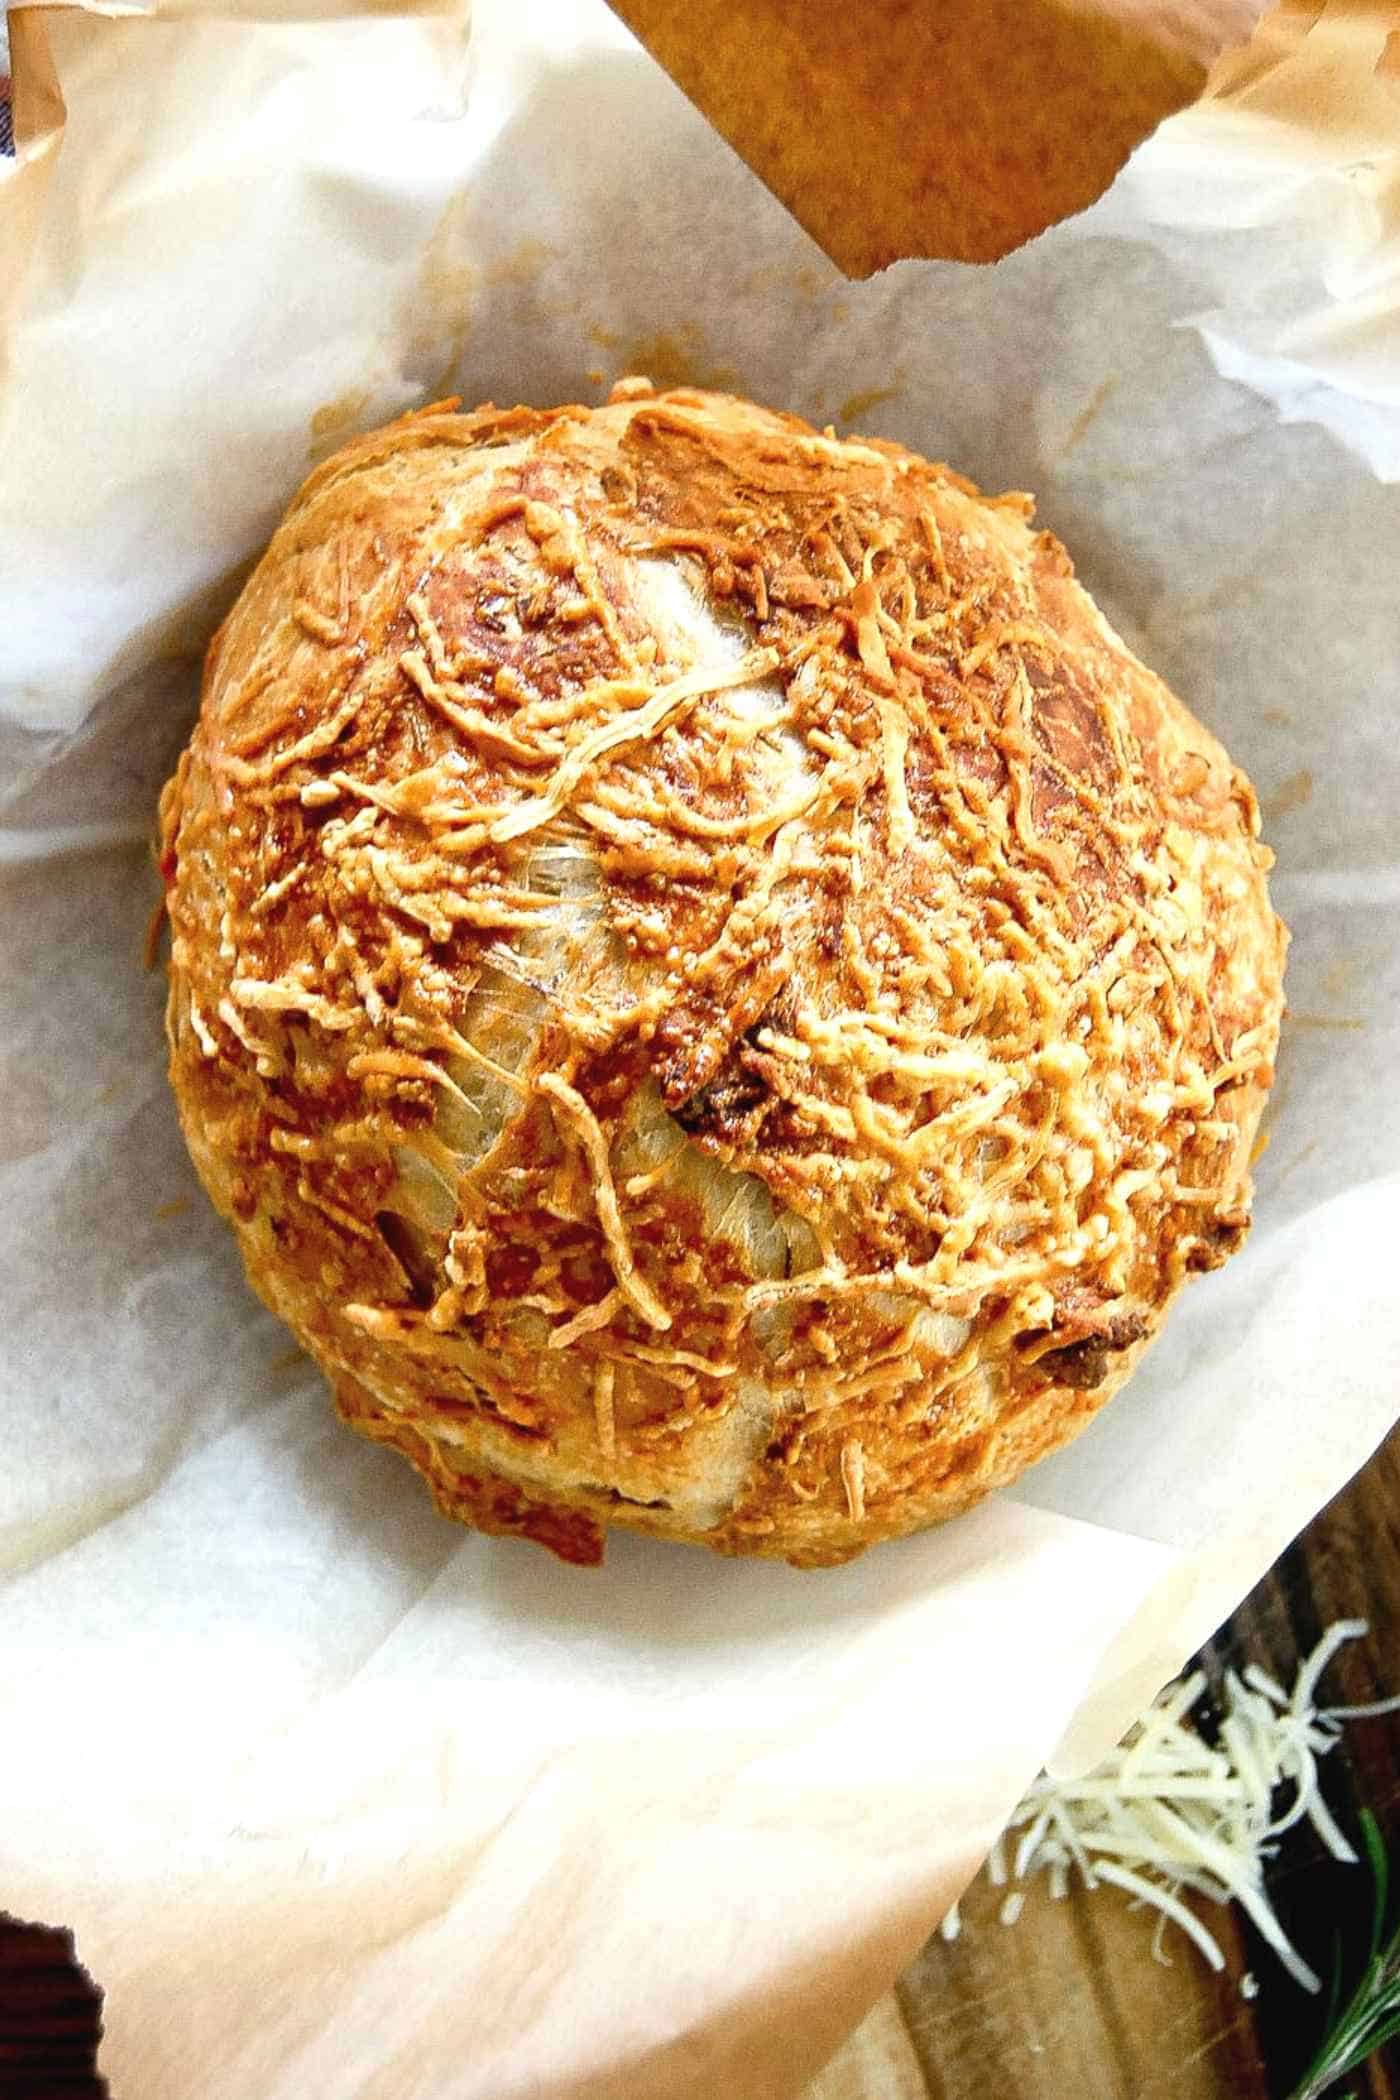
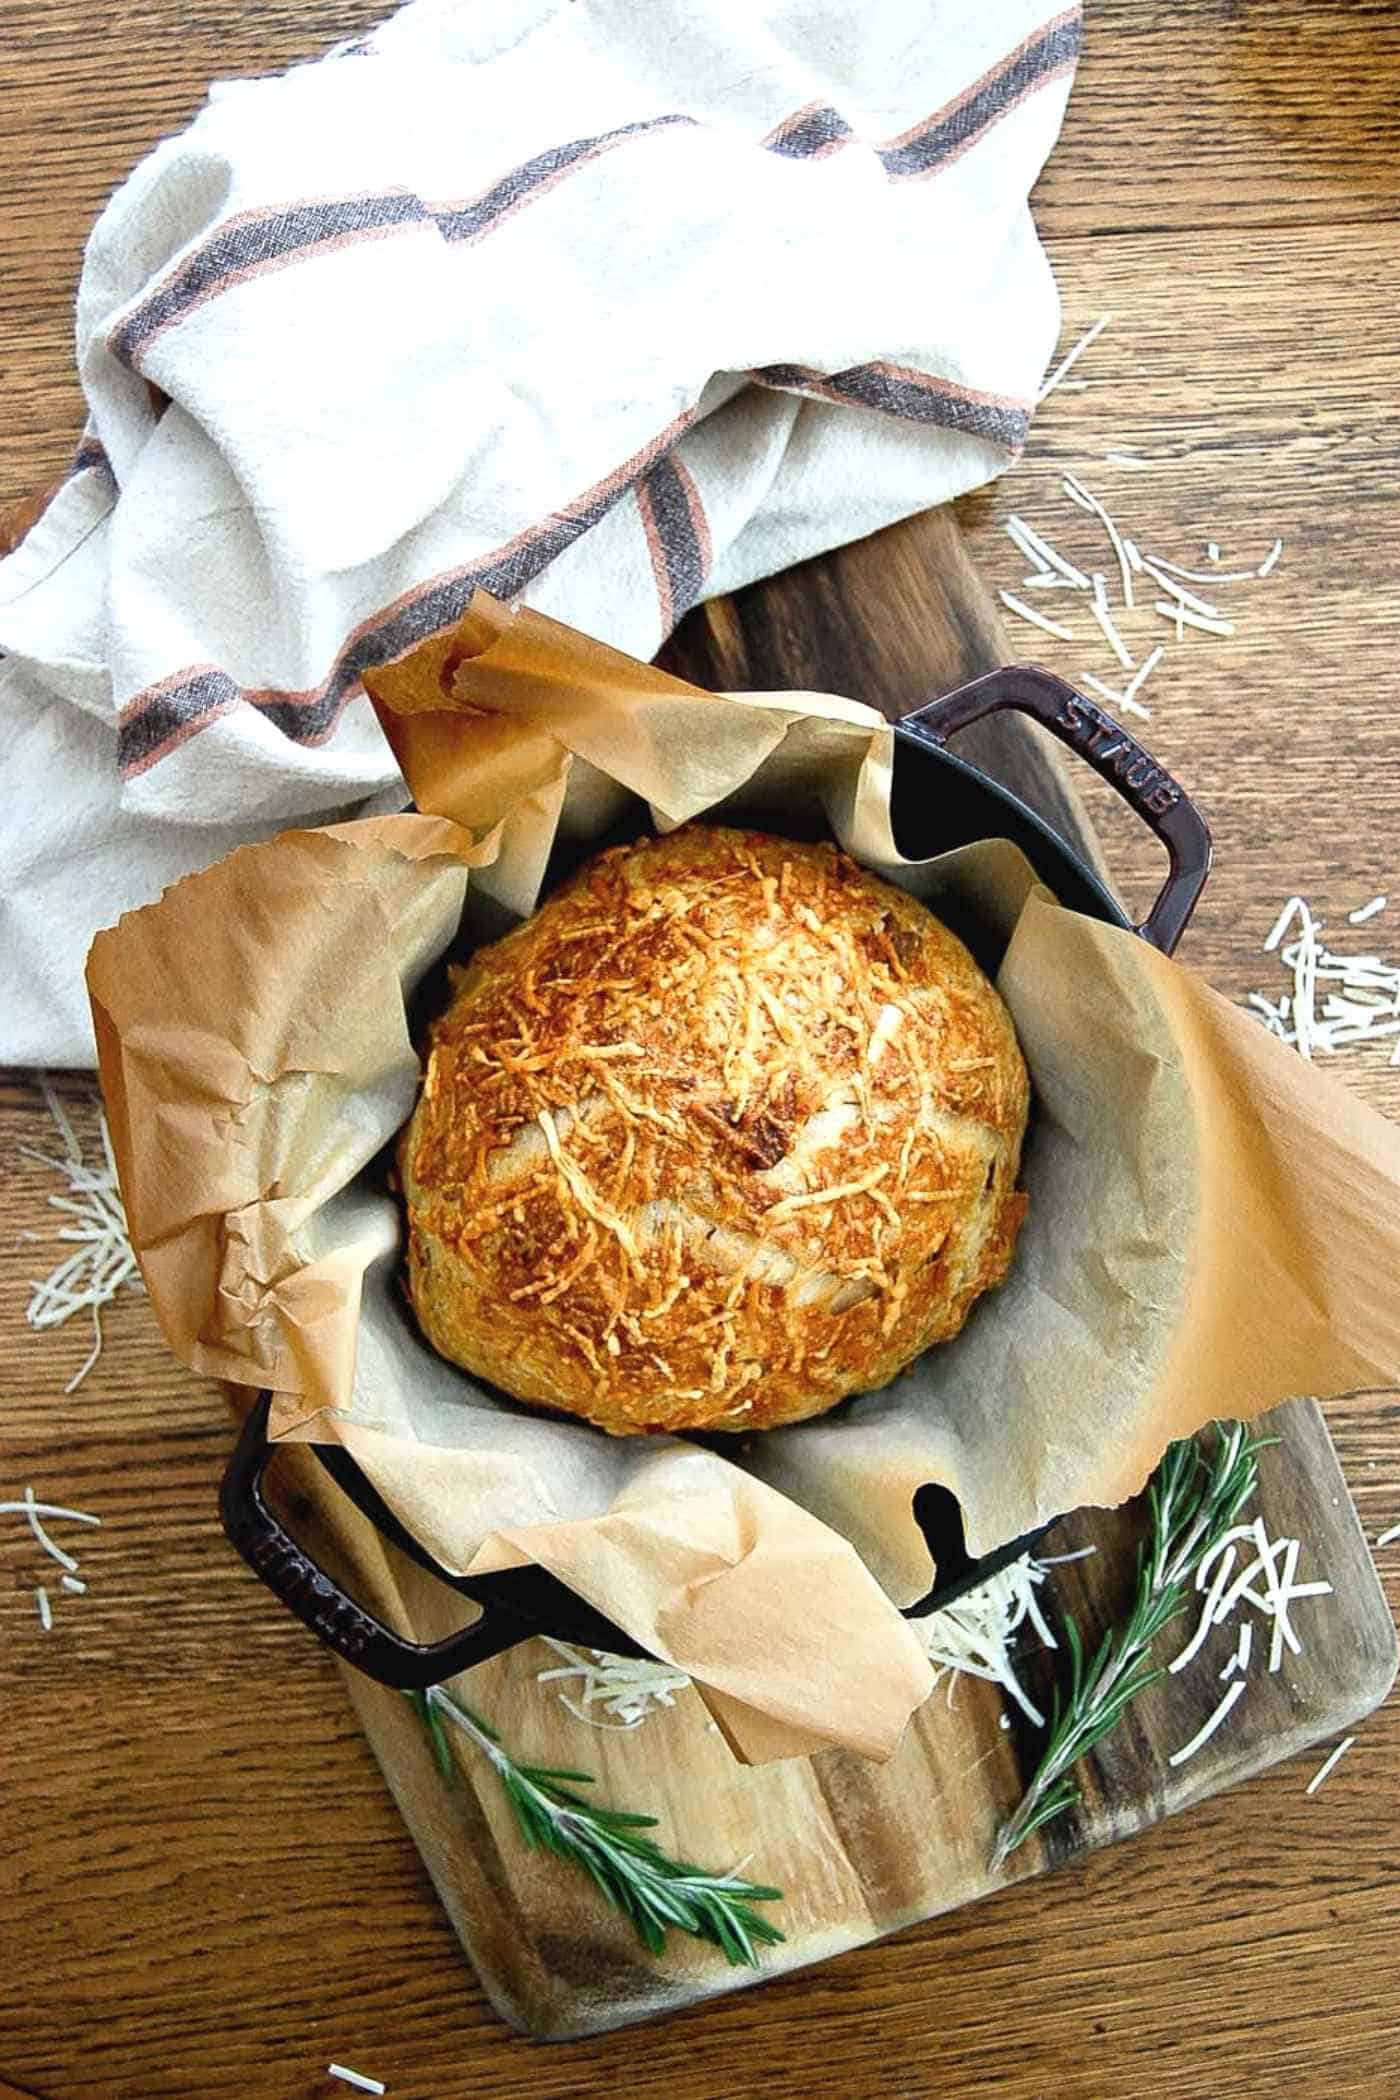
- Once your oven has preheated, carefully remove your Dutch oven or baking dish. Using your hands, lightly brush the top of the dough with ½ tablespoon of olive oil. Then, holding the edges of the parchment paper, carefully lift and lower the dough ball into the hot Dutch oven or baking dish. Finally, sprinkle plenty of Parmesan cheese and chopped fresh rosemary over the top of the bread dough, cover the bread with the lid of the Dutch oven, and place it in the oven.
- Bake the rosemary Parmesan bread for 30 minutes, covered. Then remove the lid and cook it for an additional 15 minutes, or until the bread develops a deliciously golden brown, crispy exterior.
- Remove the Parmesan bread from the oven and allow it to rest on a cutting board or a wire rack for 30 minutes before slicing and serving. (It's hard to wait that long!!)
Variations & Substitutions
- Sub out the herbs. I love the rosemary-parmesan combo here, but this bread would work well with any combination of fresh herbs, so experiment with what you can find, or what you have grown in your garden.
- Try a different flour. I've only used bread flour for this recipe, but I'd love to hear how other flours work for you!
Helpful Tips
- This rosemary parmesan bread is super forgiving - if the dough is too wet, just add a bit more flour. Too dry? Add a bit more water. It's going to be a bit looser and shaggier than other bread doughs and that's ok. It's what makes it so easy to rise.
- Want easy bread for days? - Here's a great tip if you want to save yourself some time and are looking to either feed a crowd or have homemade Parmesan bread on hand at the ready: Make a double, or even triple batch of this dough, allow it to rise, then pop it in the fridge. It will keep for about three days, and you can take out portions to use as you need it. Fresh, rosemary parmesan bread on demand!
- Longer rise time = more flavor. For best results and tons of flavor, allow the dough to rise 3-4 hours if possible (1-2 hours minimum).
- Heat the Dutch oven. Using a preheated Dutch oven to bake the bread in will help it rise.
Frequently Asked Questions
Yep! Try it using bread flour, whole wheat, or even a combination of the two.
Absolutely. Many recipes push using bread flour, which has its merits. Bread flour does allow the bread to hold its shape and rise slightly better. But I've always made this with regular all-purpose flour and it comes out spectacular every time so don't worry about getting fancy.
Absolutely! Before the bread is ready to go into the oven, just use a sharp knife or razor blade to score the top of the loaf to make a pattern.
Absolutely not. Many bread recipes will call for a Dutch oven to replicate the steam ovens at bakeries, and it's a favorite method for making homemade bread. However, you don't need to spend hundreds of dollars to have delicious bread.
You can place a pan of water below a baking dish, baking sheet, pizza stone, baking stone, or loaf pan in the oven to create a steamy environment. Or, you can try this trick from Bon Appetit and use a roasting pan to mimic the effects of a dutch oven.
I'm sure some bread making purists will shoot me down for saying this, and I'm sure you get more consistent results with weighing everything out on a kitchen scale, but I usually don't bother and just go with the standard measuring system.
Yes! Just follow your bread machine instructions after the rise time to have delicious rosemary parmesan bread in no time!
Allow the bread to cool completely before storing. I like to store this bread in a container that's covered, but still allows some air to get in. I find that storing fresh bread in an airtight container makes it turn soft and it loses it's delicious, crusty texture.
I think it's pretty darn close! You can mimic the Jersey Mike version by shaping this into a loaf for sandwiches.
If you're not able to eat this bread fast enough (this has never been a problem in my household), and you take it out of storage in a couple of days to find it hard as a rock, not to fear! It's actually quite easy to revive dried-out bread.
Simply place the entire loaf under running water for a few seconds, then reheat it in the oven at 380 degrees F for about 8-10 minutes. Voila! You're back in business!
What To Serve With Rosemary Parmesan Bread
I honestly could eat this rosemary dutch oven bread with a big ole' slab of butter as a main course, but it's also a great side to serve with:
- Salads. Served alongside this kale crunch salad or my arugula, pear and goat cheese salad, you have a full meal.
- Soups. A hearty bowl of crack chicken chili, or this simple chickpea stew is the perfect accompaniment to this crusty bread.
- Pasta. Any kind, really, but I think it especially pairs well with this Buffalo Wild Wings garlic parmesan chicken pasta, my lazy lasagna recipe, or or this pasta with peas and pancetta.
- Salmon, like this simple foil-baked salmon recipe.
- Beef
- Meatloaf. This Lipton onion soup meatloaf recipe would be perfect.
- Fish
- Mushroom ragout. Perfect to use for soaking up all that creamy mushroom sauce.
- Sheet pan chicken.
....it goes great with everything!
Did you try this easy No-Knead Rosemary Parmesan Bread? Let me know what you think in the comments! And don't forget to tag me on Instagram @frontrangefed!
More Delicious Bread Recipes To Try
- Homemade Pita Bread
- Cinnamon Raisin Bread Recipe
- Apple Bread With Cranberry & Walnuts
- Easy Moist Pumpkin Bread
- The Best Cornbread Recipe
Recipe
No-Knead Rosemary Parmesan Bread Recipe
Ingredients
- ¼ teaspoon instant yeast
- 3 ¼ cups all-purpose flour
- 2 tsps sea salt
- 1 ¾ cups warm water
- 1 ½ tablespoon dried or fresh rosemary
- 1 cup parmesan cheese, finely shredded
- ½ tablespoon olive oil
Instructions
- Make the dough - Mix the flour, yeast, sea salt, and rosemary together in a large bowl. Next, add the warm water and mix until just combined. The dough will be shaggy and rough, but that's ok.
- Leave the dough in the mixing bowl and cover it with a tea towel. Allow the dough to rise at room temperature overnight, or 12-18 hours. The longer the rise, the better the flavor and texture.
- Once the dough has risen, shape it into a dough ball. Remove the dough from the bowl and place it on a piece of lightly floured parchment paper. Sprinkle some additional flour over the top of the dough and shape it into a ball by tucking the edges in under itself. Use a little extra flour if the dough is too sticky or hard to handle. Loosely cover the dough ball with a tea towel and allow it to rest while the oven heats.
- Place a dutch oven or pyrex baking dish inside a cold oven and preheat the oven to 450 degrees, allowing the dutch oven/baking dish to heat up as the oven preheats.
- Once the oven reaches 450 degrees, carefully remove the dutch oven/baking dish. Remove the tea towel from the dough ball and lightly coat the top of the dough with the ½ tablespoon of olive oil. Sprinkle the top of the dough ball with shredded parmesan and some freshly chopped rosemary. Holding the edges of the parchment paper, carefully lower the dough ball into the dutch oven. Cover the dutch oven with it's lid and bake for 30 minutes. (If you're using a baking pan without a lid, just use aluminum foil.) Then carefuly remove the lid and bake for 10-20 minutes more, uncovered, until the crust is a crispy golden brown.
- Remove the dutch oven/baking dish from the oven, and carefully lift the bread out using the ends of the parchment paper. Allow the bread to cool on a cooling rack or cutting board for 30 minutes before slicing and serving.
Notes
- Rise time can vary - the minimum rise is 12 hours, but you can let it go to 18 for optimal flavor. Remember - longer rise= better flavor and texture!
- Make ahead - you can make the dough and let it rise for your desired time, then put it in the fridge to pull out when you need it. It will keep for 3 days in the fridge.
- Freezer friendly - cooked bread will keep for about 3 months in an airtight container in the fridge.
- All-purpose flour works just fine here, but if you're intent on using bread flour, knock yourself out.
- Use instant, or rapid-rise yeast, and make sure it isn't expired!
- You can reduce the salt by 1 tablespoon if you'd like, or if you're on a salt-restricted diet, especially since the parmesan cheese adds a touch of salt.
- Don't worry too much about how the dough looks. It will be a bit shaggy and rough, but when it bakes, it turns into a beautiful smooth loaf with lots of great holes in the crumb!
- No dutch oven? No problem! Use a baking sheet covered by a roasting pan, or simply place a pan of water below your baking bread to create a steamier environment for your bread to bake in.
- Allow the bread to cool for at least 30 minutes after removing it from the oven, as the flavor will still be developing. I know it's so hard to resist tearing into that deliciously smelling, fresh out of the oven bread, but the wait is worth it!
Explore More with AI
Nutrition


Tim says
I don't know. It didn't look right coming out of the bowl onto the parchment paper. It was my first time though, so, I had no idea anyway what it was supposed to look like! But it didn't FEEL right. Is it supposed to be "greasy" outside the bread when it's done baking? And there was liquid on the bottom of the bread, I guess that was the oil I sprinkled on before baking. I wish I had used dried rosemary instead of fresh and I wish I had put the cheese inside the mix beforehand. Also, the yeast pack says that the water needs to be between 120-130 degrees. Could that be why the yeast didn't rise very much?
Sarah Jenkins says
Hi Tim,
Thanks for your comment and I'm sorry that you had some trouble with this recipe. The bread should not be greasy on the outside, and I don't typically have liquid on the bottom. Perhaps you used a little too much oil on the top? It should just be 1/2 tbsp to lightly coat the outside of the bread.
There are so many reasons why bread might not rise very well. It could be that your water was too hot as going above that 130 degree mark can kill the yeast. Overworking the dough can also cause it to develop too much gluten and not rise. If the temperature where the bread was rising was too cold, that could have prevented it from rising well too. (I like to let my dough rise in the oven with the light on to give it just a bit of warmth.) And double check the age of your yeast packets - older yeast sometimes doesn't work as well. I hope you'll give this recipe another shot - we have it often at our house and it's always a hit!
Kim says
This No-Knead Rosemary Parmesan Bread recipe was a game-changer last night! I was craving some fresh bread to go with dinner, and this recipe was so easy and quick to throw together. The no-knead approach is perfect for busy weeknights, and the flavor of the rosemary and parmesan is incredible. My bread turned out crispy on the outside and soft and fluffy on the inside – just perfect! Thanks for sharing this fantastic recipe!
Jackie says
Just peeked at my bread after about 6 hours, definitely not shaggy any longer, but doesn’t seem like much of a rise. Should I be concerned? Only my second time making a no-knead bread and curious as to what to expect.
Sarah Jenkins says
Hmm. The rise isn't enormous, but you should be able to tell that it has risen a bit. There are many things that can prevent bread from rising - using yeast that is too old, using water that's too hot, or even the temperature in your kitchen can affect how the dough rises (a temperature that's too cold can be a problem). Let me know how it turns out - I hope the extra hours helped to expand it a bit more for you!
Laura Blackhart says
Just to make sure I'm not missing anything, we don't add the 1cup shredded Parmesan until it's about to go into the oven?
Sarah Jenkins says
Correct! That is how I make it, and the parmesan on top becomes nice and crisp (just make sure you're covering your baking vessel so the Parmesan doesn't burn!). If you prefer to have the cheese sprinkled throughout, I think you could probably add some Parmesan to the dough when you're mixing it in the first step. I have not tried it this way so if you do, let me know how it goes!
John Robert says
Could I bake this in a loaf pan? It looks GREAT
THANKS
Sarah Jenkins says
Absolutely! Using a dutch oven helps to trap steam, preventing the crust from getting to crisp before the bread has had a chance to do it's final rise in the oven. But you don't need a dutch oven to get this same effect. You can place a pan of water below a baking dish or sheet in the oven to create a steamy environment. Or, you use a $4 foil roasting pan to mimic the effects of a dutch oven. (https://www.bonappetit.com/story/bake-bread-without-a-dutch-oven). It should work just fine! Let me know how it turns out! We love this bread!
Mary says
Tried this last night and it was so good!! I let my bread rise for a full 24 hours and the flavor was incredible. Will make again!
Sarah Jenkins says
Thanks Mary! So glad you liked it. Nothing beats homemade bread!!